Getting Started with CheriBSD 25.03
Robert N. M. Watson (University of Cambridge), Jessica Clarke (University of Cambridge), Brooks Davis (SRI International), Konrad Witaszczyk (University of Cambridge) and George V. Neville-Neil (MSB Associates)
This is a living document that describes how to get up and running with CheriBSD on Morello and CHERI-RISC-V. Topics include how to download and install prebuilt CheriBSD images, how to build your own images, how third-party packages work, and where to find further information and support.
The document describes CheriBSD as of the 25.03 release, unless explicitly stated in sections referring to earlier or later releases.
This document is a work-in-progress. Feedback and contributions are welcomed. Please see our GitHub Repository for the source code and an issue tracker. There is a rendered version on the web, which is automatically updated when the git repository is committed to.
Acknowledgements
The authors gratefully acknowledge Brian Campbell (University of Edinburgh) and Elise Haldane (Digital Catapult) for their contributions to this document.
This work was supported in part by the Innovate UK project Digital Security by Design (DSbD) Technology Platform Prototype, 105694, and Innovate UK project Developing and Evaluating an Open-Source Desktop for Arm Morello, 10027440.
This work was supported by part by the Engineering and Physical Sciences Research Council (EPSRC) under UKRI3001: CHERI Research Centre.
This material is based upon work supported by the Defense Advanced Research Projects Agency (DARPA) under Contract No. HR001122C0110 ("ETC"), Defense Advanced Research Projects Agency (DARPA) Contract No. HR001123C0031 ("MTSS"), and Defense Advanced Research Projects Agency (DARPA) Contract No. FA8750-24-C-B047 ("DEC"). Any opinions, findings and conclusions or recommendations expressed in this material are those of the author(s) and do not necessarily reflect the views of the Defense Advanced Research Projects Agency (DARPA).
Introduction
CheriBSD is a version of the open-source FreeBSD operating system that has been extended to use CHERI architectural protections. CheriBSD is intended to:
- Provide a clean, in-depth illustration and template for how CHERI support can be integrated with a general-purpose, MMU-enabled operating system;
- Enable validation and evaluation of CHERI-extended processor architectures and microarchitectures;
- Act as an OS research platform for how operating systems can use CHERI;
- Support the development and evaluation of CHERI-enabled applications; and
- Provide a foundation for CHERI-enabled software demonstrations.
This guide will support you in getting up and running with CheriBSD on the CHERI-RISC-V and Arm Morello platforms. As platforms vary substantially, from instruction-set emulators and executable formal models through to FPGA- and ASIC-based hardware implementations, there are several paths that can be taken to reach a shell prompt and start productive work. You might find that you want to build CheriBSD from scratch, or simply use one of our downloadable pre-compiled images. You may want to run directly from a live image in an emulator, or alternatively want to use an installer image to install onto an internal disk in an Arm Morello-based server or workstation.
Background
CHERI
CHERI is an extension to processor Instruction-Set Architectures (ISAs) to introduce support for fine-grained memory protection and software compartmentalization. This is done by introducing a new architectural data type, the CHERI capability, which can be used to implement pointers with strong integrity, provenance validity, spatial safety, and monotonicity. CHERI requires new microarchitectural support, including support for memory tags that track the provenance validity of capabilities in registers and memory. CHERI extensions have been specified for:
- Arm's 64-bit Armv8-a ISA, with the prototype architecture known as Morello. The multi-GHz, multi-core, superscalar Morello design is a CHERI-extended version of the Arm Neoverse N1, available on an evaluation board from Arm.
- The open-source 32-bit and 64-bit RISC-V ISA, with the extended ISA known as CHERI-RISC-V. CHERI-RISC-V is available via multiple open-source soft processor cores for use on FPGA.
ISA-level emulation platforms exist for both architectures (QEMU for CHERI-RISC-V and Morello, and Arm's Morello FVP for Morello). Unless you have access to a Morello board or a high-end (and supported) FPGA development platform, using QEMU-CHERI will be the easiest way to get started using CHERI. This guide covers all of these use cases.
You can learn more about CHERI by reading the technical report, An Introduction to CHERI.
The recently published article, CHERI: Hardware-Enabled C/C++ Memory Protection at Scale, describes the CHERI software ecosystem and developing CHERI hardware stacks.
CHERI C/C++
CHERI C and CHERI C++ are programming-language dialects closely tied to CHERI-based code generation and Application Binary Interfaces (ABIs) that directly support referential and spatial memory safety. These language variants compile to pure-capability code, which implements all language- and sub-language pointers using CHERI capabilities rather than architectural integers. With suitable OS support, they can also support temporal memory safety.
CHERI C/C++ support is implemented by CHERI LLVM. The Clang/LLVM compiler is able to statically identify and report as warnings many of the incompatibilites between C/C++ and CHERI C/C++ that would result in run-time CHERI exceptions. However, a correctly compiled CHERI C/C++ program might still trigger CHERI capability violations at run time (e.g., due to pointer misalignment) that can be diagnosed with GDB.
You can learn more about CHERI C/C++ and its CheriABI run-time environment by reading the technical report, CHERI C/C++ Programming Guide.
CheriBSD
CheriBSD is an extended version of the open-source FreeBSD operating system. FreeBSD is a mature UNIX-based operating system able to run on multiple hardware architectures, and widely used in industry in service, appliance, and embedded environments. CheriBSD contains various CHERI-based extensions including support for kernel and userspace memory safety, and supports multiple software compartmentalization models. CheriBSD runs on both CHERI-RISC-V and Morello with nearly identical feature sets (Morello includes hardware virtualisation extensions not present in the CHERI-RISC-V cores, and so CHERI-extended bhyve hypervisor support is not available for CHERI-RISC-V).
CheriBSD features
CheriBSD extends FreeBSD with added CHERI-enabled features, such as kernel and userspace memory safety:
- Kernel compilation modes
- Process environments
- CheriABI desktop environment
- Userlevel heap temporal memory safety (experimental - enabled by default)
- Userlevel software compartmentalization (experimental - disabled by default)
- bhyve hypervisor (experimental)
All of these features ship in the CheriBSD release, but some are not enabled by default.
Kernel compilation modes
The CheriBSD kernel can be compiled as hybrid, pure-capability, or benchmark code:
- The hybrid kernel enables capability use in userspace while making relatively little use of capabilities in the kernel's own implementation.
- The pure-capability kernel implements strong referential and spatial memory protection internally in the kernel, protecting against memory-safety vulnerabilities in components such as the network stack and system-call layer.
- The benchmark kernel implements the Benchmark ABI which improves performance on the Arm Morello board at the cost of reduced security. The benchmark kernel is considered appropriate for a performance evaluation of the Arm Morello architecture and third-party software executed on it. It should not be used for a security evaluation and the pure-capability kernel should be used instead.
Userlevel process environments
CheriBSD 25.03 likewise supports three different userspace execution environments:
-
Hybrid processes provide strong binary compatibility with the non-CHERI version of the same architecture -- for example, aarch64 on Morello.
-
CheriABI processes support pure-capability code execution. This process environment implements strong referential, spatial, and heap temporal memory protection through the system-call interface, dynamic linker, language runtime including heap memory allocators, and compiler-generated code. This protects against memory memory-safety vulnerabilities in both system services and applications. See Building for CheriABI for information on building for CheriABI. CheriABI is described in an ASPLOS 2019 paper.
-
Benchmark ABI processes implement a code-generation model similar to CheriABI, but with relaxed program-counter capability bounds that enable improved performance prediction on the Arm Morello platform. See Building for the Benchmark ABI. The Benchmark ABI is described in a technical report on the topic from Arm and Cambridge.
All of these environments can be used over either of the hybrid or
pure-capability kernels.
You can determine the process environment that a particular process is using
via the procstat(1) command, whose default output includes an EMUL
column indicating the process ABI:
% procstat -a
  PID  PPID  PGID   SID  TSID THR LOGIN    WCHAN     EMUL           COMM
...
 3197  3193  3193  3193     0   1 robert   select    FreeBSD ELF64C sshd
 3214  3170  3214  3170  3170   1 robert   select    FreeBSD ELF64  bash
...
In this example, the sshd daemon is using CheriABI (FreeBSD ELF64C), and
the bash command is using the Hybrid ABI (FreeBSD ELF64).
Pre-compiled third-party software applications (packages) are provided for each of these ABIs, although CheriABI and Benchmark ABI packages are currently considered experimental. This is discussed further in the chapter on packages.
CheriABI desktop environment (experimental)
The installer has the option to install a desktop environment using the Mali
Bifrost GPU on the Morello System-on-Chip.
The option installs a basic desktop environment using KDE and Wayland compiled
for CheriABI with the cheri-desktop package.
It also installs a hybrid ABI Chromium web browser via the
cheri-desktop-hybrid-extras package.
Userlevel heap temporal memory safety (experimental)
Since CheriBSD 23.11 there has been support for userlevel heap temporal memory safety based on a load-barrier extension to Cornucopia, which is inspired by garbage-collection techniques. Our paper on Cornucopia Reloaded, which appeared in ASPLOS 2024, describes this work in detail.
This feature involves a collaboration between the kernel (which provides
asynchronous capability revocation with VM acceleration) and the userlevel
heap allocator (which quarantines freed memory until revocation of any
pointers to it) to ensure that memory cannot be reallocated until there are
no outstanding valid capabilities lasting from its previous allocation.
The userlevel memory allocator and the kernel revoker share an epoch counter
that counts the number of completed atomic revocation sweeps.
Memory added to quarantine in one epoch cannot be removed from quarantine
until at least one complete epoch has passed -- i.e., the epoch counter has
been increased by 2.
More information on temporal memory safety support can be found in the
mrs(3) man page:
man mrs
Checking whether temporal safety is globally enabled
Use the sysctl(8) command to inspect the value of the
security.cheri.runtime_revocation_default system MIB entry:
sysctl security.cheri.runtime_revocation_default
This sysctl sets the default policy for revocation used by processes on
startup, which is enabled by default as of CheriBSD 23.11.
We recommend setting this in /boot/loader.conf, which is processed by the
boot loader before any user processes start.
Controlling revocation by binary or process
You can forcefully enable or disable revocations for a specific binary or process with elfctl(1) or proccontrol(1) and ignore the default policy:
elfctl -e <+cherirevoke or +nocherirevoke> <binary>
proccontrol -m cherirevoke -s <enable or disable> <program with arguments>
You can read more on these commands in the mrs(3) man page.
Synchronous revocation
Revocation normally occurs asynchronously, with a memory quarantine preventing memory reuse until revocation of any pointers to that memory. You can insert a specific call in your program to await synchronous revocation:
malloc_revoke();
Synchronous revocation on every call to free() can be configured using the
_RUNTIME_REVOCATION_EVERY_FREE_ENABLE environmental variable.
Note that synchronous revocation can incur extremely high expense.
Monitoring revocation in processes
Use the procstat cheri -v command to inspect the CHERI memory-safety state
of a target process.
For example:
# procstat cheri -v 923 1012
  PID COMM                C QUAR  RSTATE                              EPOCH
  923 seatd               P  yes    none                                  0
 1012 Xorg                P  yes    none                               0xd2
Both processes in this example use a pure-capability process environment, have quarantining enabled, and are not currently revoking. seatd has never needed to perform a revocation pass, as it remains in epoch 0, whereas X.org has a non-zero epoch and has performed multiple passes.
Userlevel software compartmentalization (experimental)
CheriBSD implements two different CHERI-enabled software compartmentalization models:
- Colocated processes (co-processes) compartmentalization accelerates UNIX Inter-Process Communication (IPC) and context switching by colocating multiple processes in the same address space, separating them using CHERI capabilities. Support for co-processes is maintained in an experimental development branch and is not included in current software releases. For more information see the Colocation Tutorial wiki page.
- Dynamic-linkage-based compartmentalization isolates shared libraries within a process using CHERI capabilities limiting the access of attackers who have achieved arbitrary code execution within a library. The linkage-based compartmentalization prototype has been included since the 22.12 release of CheriBSD. See the c18n(3) man page on an installed system for more information.
Linkage-based compartmentalization
CheriBSD's linkage-based compartmentalization feature (c18n) executes each dynamic library within a compartmentalization-enabled process in its own protection domain. When c18n is enabled, the run-time linker grants libraries capabilities only to resources (global variables, APIs) declared in their ELF linkage. Function calls that cross domain boundaries are interposed on by domain-crossing shims implemented by the run-time linker.
The adversary model for these compartments is one of trusted code but
untrustworthy execution: a library such as libpng or libjpeg is trusted
until it begins dynamic execution -- and has potentially been exposed to
malicious data.
With linkage-based compartmentalization, an adversary who achieves arbitrary
code execution within the library at run time will be able to reach only the
resources (and further attack surfaces) declared statically through its
linkage.
The programmer must then harden that linkage, and any involved APIs, to make
them suitable for adversarial engagement -- but the foundation of isolation,
controlled access, and controlled domain transition is provided by the c18n
implementation.
Note that linkage-based compartmentalization is still an experimental work in progress and does not yet provide complete isolation between compartments. More information on security caveats can be found in the c18n(7) man page:
man c18n
Enabling linkage-based compartmentalization system-wide
Compartmentalization can be enabled for all eligible new processes with
sysctl:
sysctl security.cheri.lib_based_c18n_default=1
Enabling linkage-based compartmentalization temporarily for a particular binary
To run a particular binary with linkage-based compartmentalization enabled
just for this run, use proccontrol:
proccontrol -m cheric18n -s enable ./helloworld
Enabling linkage-based compartmentalization permanently for a particular binary
To enable linkage-based compartmentalization permanently for a particular binary, run the following command to set a flag in the binary:
elfctl -e +cheric18n ./helloworld
This can be reversed by replacing +cheric18n with -cheric18n.
You can confirm whether c18n is permanently enabled for a binary by
inspecting it using the elfctl command:
elfctl ./helloworld
The output will contain two lines like the following indicating whether c18n is enabled or disabled.
cheric18n       'Force Enable CHERI library-based compartmentalisation' is set.
nocheric18n     'Force Disable CHERI library-based compartmentalisation' is unset.
Note that nocheric18n disables c18n for the binary, overriding the
system-wide default.
Tracing compartment-boundary crossings
The BSD ktrace(1) command is able to trace compartment-boundary crossings.
To enable this feature, set the LD_UTRACE_COMPARTMENT environmental
variable, which will cause the run-time linker to emit records using the
utrace(2) system call.
Run the program under ktrace with the -tu argument to capture only those
records (and not a full system-call trace):
env LD_UTRACE_COMPARTMENT=1 ktrace -tu ./helloworld
The resulting ktrace.out file can be viewed using the kdump(1) command:
kdump
It is important to understand, however, that simply isolating running code is almost always insufficient to achieve robust sandboxing. The competent adversary will now consider further rights and attack surfaces to explore in search of further vulnerabilities. While this increased work factor of finding additional vulnerabilities is an important part of compartmentalization, internal software APIs are rarely well suited to be security boundaries without performing additional hardening. With this in mind, you can:
- Inspect the source code, output from
objdump, and output fromchericatto assess the robustness of this compartmentalization. You can installobjdumpwithpkg64 install llvm-baseandchericatwithpkg64c install chericat. - Consider larger software architectural changes that will allow a library to be used more robustly when running within a computerment.
Linkage-based compartmentalization has the potential to significantly improve software integrity and confidentiality properties in the presence of a strong adversary. However, it is also limited by the abstraction being around the current library operational model.
bhyve hypervisor (experimental)
CheriBSD implements experimental CHERI extensions to FreeBSD's bhyve Type 2 hypervisor on the Morello architecture. This allows bhyve to host CHERI-enabled virtual machines, including those running CheriBSD.
Unsupported FreeBSD features
Certain FreeBSD features are currently unavailable in CheriBSD, including:
- DTrace
Many other kernel features are not yet well validated, including:
- Most optional modules, such as various firewall systems
Reporting bugs
Bug reports relating to these under-validated subsystems would be appreciated, and may be submitted to the CheriBSD GitHub issue tracker.
Getting CheriBSD
CheriBSD can be installed by downloading or building one of two types of disk images:
-
Memstick images that boot and automatically run
bsdinstall, the FreeBSD installer, which can be used to prepare a filesystem on a disk, and then install CheriBSD onto it. These will typically be used on Arm Morello boards. -
Live images that boot CheriBSD to a login prompt for interactive use. These will typically be used on instruction-set emulators such as QEMU and the Arm Morello FVP, as well as on FPGA.
Downloading image files
Memstick and live images can both be downloaded from the CheriBSD
website.
Images are compressed using the UNIX xz command, and must be decompressed
before they can be used; for example by running:
unxz cheribsd-memstick-arm64-aarch64c-25.03.img.xz
Building image files
CheriBSD can be built natively on an existing CheriBSD system (e.g., on an Arm Morello box), and it can also be cross-built from FreeBSD, Linux, and macOS. Building natively from an ISA-level emulator, such as QEMU, is not recommended for performance reasons.
-
Native builds follow the same build procedure as used for the baseline FreeBSD operating system. Suitable git command-line substitions must be made to use CheriBSD rather than FreeBSD source code.
-
CheriBSD cross-build orchestration is performed by the Python-based cheribuild tool, which is able to build CHERI-enabled toolchain, operating-system stack, and various applications and other software used by the CHERI project.
Key source repositories
CheriBSD repositories currently reside in the CTSRD-CHERI GitHub Organization:
- cheribuild GitHub repository
- CheriBSD GitHub repository
- CHERI Clang/LLVM GitHub repository
- CHERI GDB GitHub repository
- QEMU-CHERI GitHub repository
Unless you intend to modify CheriBSD, CHERI Clang/LLVM, CHERI GDB, or QEMU-CHERI, you should not generally need to manually check out or compile most of the above repositories. Instead, existing prebuilt software images/packages should be used, or the cheribuild command, which will orchestrate software cross-build for you.
Checking out cheribuild
cheribuild is a Python-based build orchestration tool that is the preferred way to cross-build CheriBSD. It can be checked out from GitHub:
git clone git@github.com:CTSRD-CHERI/cheribuild.git
Building and running CheriBSD/RISC-V in QEMU
The following command builds a CheriBSD/RISC-V live image, and boots it in QEMU-CHERI:
% ./cheribuild.py -d build-and-run-cheribsd-riscv64-purecap
Building and running CheriBSD/Morello in QEMU
The following command builds a CheriBSD/Morello live image, and boots it in QEMU-CHERI:
% ./cheribuild.py -d build-and-run-cheribsd-morello-purecap
Building CheriBSD/Morello release images
The following command builds a CheriBSD/Morello installer (memstick) image suitable to write to a USB stick:
% ./cheribuild.py -d --clean cheribsd-release-morello-purecap
The resulting image file will be generated in a file with a name along the
lines of:
output/cheribsd-release-morello-purecap/FreeBSD-15.0-CURRENT-arm64-aarch64c-memstick.img.
This is relative to your cheribuild destination root, which is, by default,
~/cheri.
Obtaining further information
The cheribuild README.md
provides detailed information on various parameters and targets its supports,
as well as its dependencies.
CheriBSD on an Arm Morello board
Arm's Morello board contains a quadcore CHERI-extended Neoverse N1 processor design, as well as two management microcontrollers. CheriBSD is able to run on, and fully utilize, Morello's CHERI support to implement fine-grained kernel and userspace memory safety, and on experimental branches, also implement scalable software compartmentalization. You can install CheriBSD into the hard disk in your Morello box using a USB stick installer image. You will first need to upgrade the firmware, as older firmware revisions contain bugs or lack features essential to running the OS. This chapter explains how to:
- Connect to the Morello management and system consoles via USB,
- Upgrade the board's firmware, and
- Install CheriBSD from a USB stick.
It is also possible to run CheriBSD from a USB stick, or netboot CheriBSD on the board, but those topics are not currently covered by this guide.
It is important that the most recent Arm-provided firmware be installed on your Morello board, as the board has most likely shipped with an older firmware version. If you are not running the latest version, you may experience hard-to-diagnose behaviour or reliability problems.
Accessing the Morello console
You can manage the Morello board, including reaching its multiple serial consoles and firmware flash storage, via a USB cable connected to a second computer -- typically a workstation or remote management server. When you plug the USB cable into your workstation, a number of different devices will attach (depending on device drivers on your workstation), including:
- Arm Morello USB debug and trace
- Flash storage used for firmware (an on-board SD card)
- Two 4-port USB-to-serial converters
Each controller has a unique serial number ending in the letter "A" or B". The serial-port converters attach to UARTs associated with:
- The MCC management microcontroller (converter B port 0)
- The PCC management microcontroller (converter B port 1)
- The Morello system console (converter B port 2)
In normal use, only the MCC and Morello system console ports will be used.
You can connect to these using a serial access tool such as cu(1), or a full
terminal emulation environment such as screen(1).
The precise names of the /dev device nodes appearing on the workstation
depend on the operating system being used.
Often access will also require running the terminal command under su(8) or
sudo(8), or adding your user to a dialer or similar group to grant access to
the USB device nodes.
Connecting from FreeBSD
FreeBSD names USB device nodes in the order they probe and attach. Typical command lines to access the MCC and Morello consoles are:
- MCC console:
cu -s 115200 -l /dev/cuaU0 - Morello console:
cu -s 115200 -l /dev/cuaU2
Connecting from Ubuntu
Linux uses similar device names to FreeBSD. Typical command lines to access the MCC and Morello consoles are:
- Management console:
sudo picocom -b 115200 /dev/ttyUSB0 - Morello console:
sudo picocom -b 115200 /dev/ttyUSB2
Connecting from Apple macOS
macOS creates /dev/cu.usbserial- device nodes that embed the device
serial number (including A or B) and port number.
Typical command lines to access the MCC and Morello consoles are:
- MCC console:
cu -s 115200 -l /dev/cu.usbserial-00FT41683097B0 - Morello console:
cu -s 115200 -l /dev/cu.usbserial-00FT41683097B2
You will need to substitute the serial numbers of the USB converters in your specific Morello board for these commands to work.
Connecting from Windows
Windows requires the installation of FTDI drivers to access the Morello board's USB ports, and the OS should identify the appropriate driver version once the board is connected. Plink is a CLI bundled with PuTTY, a third-party terminal emulator and SSH client freely available from the Windows Store and the developer's official website. After installing the drivers and PuTTY, typical command lines to access the MCC and Morello consoles are:
- MCC console:
plink -serial \\.\COM3 -sercfg 115200 - Morello console:
plink -serial \\.\COM5 -sercfg 115200
Do note that Windows assigns serial numbers at random.
Upgrading the Morello firmware
Newer Morello firmware versions contain important feature extensions (such as support for network booting) and also bug fixes (such as persistent variable support for UEFI, which is relied on for CheriBSD boot).
More detailed information from Arm on Morello firmware builds and configuration can be found here. The instructions in this guide are an abbreviated and slightly modified set of instructions better tuned to CheriBSD requirements.
Setting the system clock
Start by setting the system date and time in the MCC. Although the Arm documentation recommends setting your local time, we recommend using UTC with CheriBSD:
Cmd> debug
Debug> time
Debug> date
Debug> exit
Downloading prebuilt firmware
Arm provides prebuilt firmware
images via the
Morello GitLab instance, although you can also build your own.
Start by downloading this directory tree, which can be done by performing a
git clone:
git clone https://git.morello-project.org/morello/board-firmware.git
Reflashing the firmware
The Morello firmware is stored on a 2.0GiB SD Card on the Morello board within the case. The SD Card content can be exposed as a USB mass storage device accessible over the USB cable from your workstation. This may require first enabling USB support on the MCC console:
Cmd> USB_ON
Enabling debug USB...
The SD Card will attach as a USB disk containing a FAT filesystem.
Depending on your workstation operating system, this may be automatically
mounted (e.g., on macOS), or require manual mounting (e.g., on FreeBSD).
Once mounted, delete the existing firmware and configuration, and then copy on
the new version (substituting an appropriate mounted directory for /mnt
below):
rm -rf /mnt/*
cp -R board-firmware/* /mnt
sync
Depending on your workstation OS and configuration, you may need to run as
root, or use sudo(8), to execute these commands.
Some shells may require confirmation before they will complete the rm
command.
When done, you must unmount the mounted filesystem to ensure that all blocks
in your workstation's filesystem buffer cache have been written back, and to
avoid concurrent accesses leading to possible filesystem corruption.
This must be done before issuing the MCC reboot command.
Rebooting the MCC
Complete the upgrade by rebooting the Morello board via the MCC:
Cmd> reboot
Rebooting...
Disabling debug USB..
Recovering the SD Card format
If you find that your SD Card no longer has a correct partition table (for example, if like the author you have written an installer image over it by accident) you will need to restore it to the original state with a FAT formated volume named M1SDP. The mechanism for creating such a filesystem will vary by OS. After you have created the FAT filesystem, follow the instruction above to copy the firmware into place and install it.
Linux
On Linux the following commands will create and format the FAT32 partition:
parted /dev/sdX mktable msdos
parted /dev/sdX mkpart primary fat32 0% 100%
mkfs.msdos /dev/sdX1
In this command /dev/sdX should be replaced by the path to the SD Card
device.
MacOS
On MacOS the following command will create and format the M1SDP partition:
diskutil partitionDisk /dev/disk# 1 MBRFormat MS-DOS M1SDP 100%
In this command /dev/disk# should be replaced by the path to the SD Card
device.
Installing on a Morello Board
Please ensure that you have upgraded the Morello board firmware before proceeding to CheriBSD installation.
Once you have a disk image, you will either need to write it to a USB stick to boot an Arm Morello system, or specify it as an argument to an emulator such as QEMU-CHERI or the Arm Morello FVP.
Note that some screen shots in these instructions are from the 24.05 release, and will be updated soon.
Writing an installer disk image to a USB stick
If the image file you have downloaded is compressed (i.e., has a .xz
filename suffix), you will need to first decompress the image:
unxz cheribsd-memstick-arm64-aarch64c-25.03.img.xz
With appropriate substitutions of image filename and target device, the following command would write the image to a USB stick for use with a Morello board:
dd if=cheribsd-memstick-arm64-aarch64c-25.03.img of=/dev/DISK bs=1M
It is also possible to write a live image to a USB stick, with appropriate filename substitution.
On systems such as Ubuntu you can also use the GNOME Disks utility to write to a USB stick:
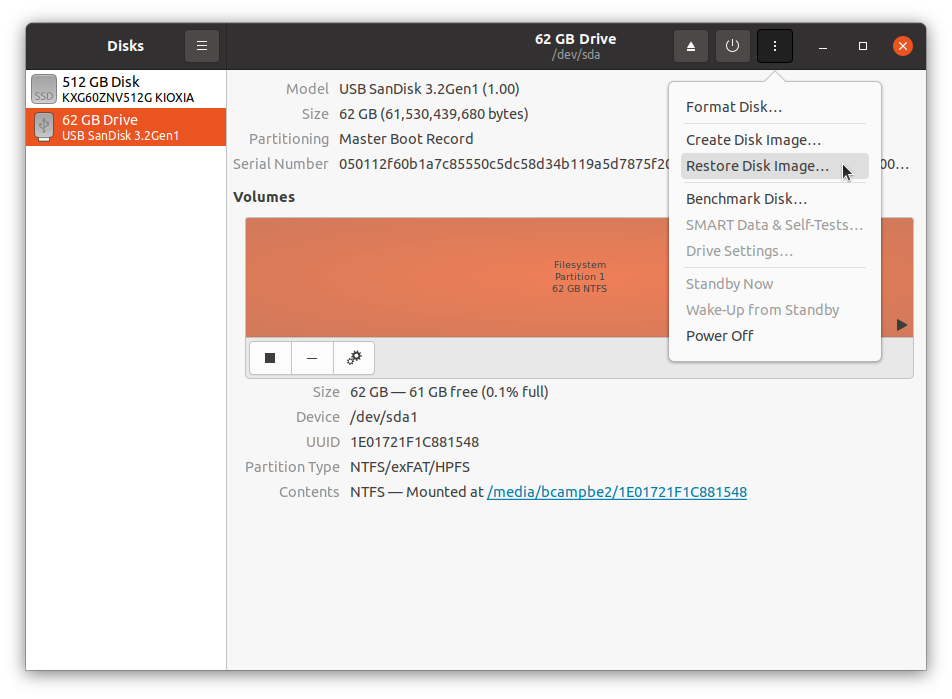
First select the USB stick in the left pane, then use the menu at the top right to select "Restore Disk Image...". It will ask for the image to write and confirm which device will be written to. Finally the eject icon can be used to safely remove the stick before use.
Installing an Arm Morello system
It is possible to use Arm Morello systems both by booting the live image on a USB stick, and also by installing to the internal hard disk. In this section, we describe the how to perform an installation using the memstick image.
Starting the boot
Before powering on your Morello board, ensure that the installer USB stick is inserted into one of the USB ports on the board. Use the power switch to power the board on, which should lead to firmware output on the MCC console during a multi-minute initialization and boot cycle.
Once that has completed, you will see Morello firmware output on the Morello console. When this message is presented, press Escape to enter the UEFI boot menu:
Press ESCAPE for boot options .......
At the UEFI menu, select Boot Manager using the cursor keys, and press Enter:
   Select Language            <Standard English>         This selection will
                                                         take you to the
 > Device Manager                                        Device Manager
 > Boot Manager
 > Boot Maintenance Manager

   Continue
   Reset


  ^v=Move Highlight       <Enter>=Select Entry
Select your USB stick from the Boot Manager menu using the cursor keys, and press enter. In the example below, it is the SanDisk Ultra USB 3.0 device:
/------------------------------------------------------------------------------\
|                                Boot Manager                                  |
\------------------------------------------------------------------------------/

                                                         Device Path :
   Boot Manager Menu                                     PcieRoot(0x0)/Pci(0x0,
                                                         0x0)/Pci(0x0,0x0)/Pci(
   UEFI Shell                                            0x14,0x0)/Pci(0x0,0x0)
   UEFI Misc Device                                      /USB(0x5,0x0)
   UEFI WDC WDS240G2G0A-00JH30 2143B2455605
   UEFI PXEv4 (MAC:0002F7009856)
   UEFI HTTPv4 (MAC:0002F7009856)
   UEFI HTTPv6 (MAC:0002F7009856)
   UEFI PXEv6 (MAC:0002F7009856)
   UEFI SanDisk Ultra USB 3.0
   0101cfbb32adfd6c145cd38e7d6164cd167456963c3a71b9f157
   e574567b43d96c6000000000000000000000e49dde42009f1a00
   955581079e275d95
   UEFI Non-Block Boot Device
                                                       v
/------------------------------------------------------------------------------\
|                                                                              |
| ^v=Move Highlight       <Enter>=Select Entry      Esc=Exit                   |
\------------------------------------------------------------------------------/
This will be followed by the CheriBSD boot loader and kernel output. You can press Enter to proceed, or wait for the countdown timer to finish:
    _____ _               _ ____   _____ _____
   / ____| |             (_)  _ \ / ____|  __ \
  | |    | |__   ___ _ __ _| |_) | (___ | |  | |
  | |    | '_ \ / _ \ '__| |  _ < \___ \| |  | |
  | |____| | | |  __/ |  | | |_) |____) | |__| |
   \_____|_| |_|\___|_|  |_|____/|_____/|_____/
                                                 ```                        `
                                                s` `.....---.......--.```   -/
 /---------- Welcome to CheriBSD ----------\    +o   .--`         /y:`      +.
 |                                         |     yo`:.            :o      `+-
 |  1. Boot Installer [Enter]              |      y/               -/`   -o/
 |  2. Boot Single user                    |     .-                  ::/sy+:.
 |  3. Escape to loader prompt             |     /                     `--  /
 |  4. Reboot                              |    `:                          :`
 |  5. Cons: Serial                        |    `:                          :`
 |                                         |     /                          /
 |  Options:                               |     .-                        -.
 |  6. Kernel: default/kernel (1 of 1)     |      --                      -.
 |  7. Boot Options                        |       `:`                  `:`
 |                                         |         .--             `--.
 |                                         |            .---.....----.
 \-----------------------------------------/
   Autoboot in 10 seconds. [Space] to pause
Note that seperate instances of the installer will run on both the video and serial consoles. Care should be taken to ensure that only one is used as no mechanism is implemented to prevent one from destroying the other's work.
On the serial console, you will eventually be prompted to select a terminal emulation type:
Welcome to FreeBSD!

Please choose the appropriate terminal type for your system.
Common console types are:
   ansi     Standard ANSI terminal
   vt100    VT100 or compatible terminal
   xterm    xterm terminal emulator (or compatible)

Console type [xterm]:
In most cases, simply hitting Enter will be the right thing to do.
This will enter bsdinstall, the interactive FreeBSD installer.
bsdinstall
bsdinstall uses the libdialog text interface library.
Be aware that you will sometimes need to use the space bar, and not enter
key, to select menu options, which many users find confusing.
Select Install at the first menu by hitting Enter:
                   ┌────────────────┤Welcome├────────────────┐
                   │ Welcome to FreeBSD! Would you like to   │
                   │ begin an installation or use the live   │
                   │ system?                                 │
                   ├─────────────────────────────────────────┤
                   │[  Install  ] [   Shell   ] [Live System]│
                   └─────────────────────────────────────────┘
Keymap selection
If you intend only to use the serial console, and not video console, select the default keymap by hitting Enter at the next menu; otherwise, use the cursor keys and space bar to select a country-specific keyboard layout:
       ┌───────────────────────┤Keymap Selection├────────────────────────┐
       │ The system console driver for FreeBSD defaults to standard "US" │
       │ keyboard map. Other keymaps can be chosen below.                │
       │ ┌─────────────────────────────────────────────────────────────┐ │
       │ │>>> Continue with default keymap                             │ │
       │ │->- Test default keymap                                      │ │
       │ │( ) Armenian phonetic layout                                 │ │
       │ │( ) Belarusian                                               │ │
       │ │( ) Belgian                                                  │ │
       │ │( ) Belgian (accent keys)                                    │ │
       │ │( ) Brazilian (accent keys)                                  │ │
       │ │( ) Brazilian (without accent keys)                          │ │
       │ │( ) Bulgarian (BDS)                                          │ │
       │ │( ) Bulgarian (Phonetic)                                     │ │
       │ │( ) Canadian Bilingual                                       │ │
       │ └─↓↓↓──────────────────────────────────────────────────── 41%─┘ │
       ├─────────────────────────────────────────────────────────────────┤
       │                      [Select]     [Cancel]                      │
       └────────────────── Press arrows, TAB or ENTER ───────────────────┘
Hostname
Press Enter to accept the default hostname, or replace it:
            ┌───────────────────┤Set Hostname├────────────────────┐
            │ Please choose a hostname for this machine.          │
            │                                                     │
            │ If you are running on a managed network, please ask │
            │ your network administrator for an appropriate name. │
            │ ┌─────────────────────────────────────────────────┐ │
            │ │cheribsd                                         │ │
            │ └─────────────────────────────────────────────────┘ │
            ├─────────────────────────────────────────────────────┤
            │                      [  OK  ]                       │
            └─────────────────────────────────────────────────────┘
Partitioning (automatic or manual)
This tutorial assumes that you are performing a fresh install, or a complete reinstall of your Morello system, with the intention of booting only CheriBSD. It also assumes that you will be using the UFS file system. If these assumpsions are not true, read the FreeBSD documentation for more information on partitioning disks before proceeding.
Press Enter to select an automated UFS install:
              ┌─────────────────┤Partitioning├──────────────────┐
              │ How would you like to partition your disk?      │
              │ ┌─────────────────────────────────────────────┐ │
              │ │Auto (UFS) Guided UFS Disk Setup             │ │
              │ │Auto (ZFS) EXPERIMENTAL Guided Root-on-ZFS   │ │
              │ │Manual     Manual Disk Setup (experts)       │ │
              │ │Shell      Open a shell and partition by hand│ │
              │ └─────────────────────────────────────────────┘ │
              ├─────────────────────────────────────────────────┤
              │              [  OK  ]     [Cancel]              │
              └─────────────────────────────────────────────────┘
Partition (entire disk)
Select Entire Disk and press Enter:
                 ┌────────────────┤Partition├────────────────┐
                 │ Would you like to use this entire disk    │
                 │ (ada0) for FreeBSD or partition it to     │
                 │ share it with other operating systems?    │
                 │ Using the entire disk will erase any data │
                 │ currently stored there.                   │
                 ├───────────────────────────────────────────┤
                 │      [Entire Disk]     [ Partition ]      │
                 └───────────────────────────────────────────┘
Partition (entire disk - confirmation)
Press Enter to confirm:
                 ┌────────────────┤Partition├────────────────┐
                 │ Would you like to use this entire disk    │
                 │ (ada┌────────┤Confirmation├─────────┐     │
                 │ shar│ This will erase the disk. Are │     │
                 │ Usin│ you sure you want to proceed? │  ta │
                 │ curr├───────────────────────────────┤     │
                 ├─────│     [ Yes  ]     [  No  ]     │  ───┤
                 │     └───────────────────────────────┘     │
                 └───────                                 ───┘
Partition Editor
Review the proposed partition scheme, select Finish, and then press Enter to proceed:
            ┌─────────────────┤Partition Editor├──────────────────┐
            │ Please review the disk setup. When complete, press  │
            │ the Finish button.                                  │
            │                                                     │
            │                                                     │
            │ ┌─────────────────────────────────────────────────┐ │
            │ │ada0       224 GB    GPT                         │ │
            │ │  ada0p1   260 MB    efi             /boot/efi   │ │
            │ │  ada0p2   220 GB    freebsd-ufs     /           │ │
            │ │  ada0p3   3.6 GB    freebsd-swap    none        │ │
            │ │da0        29 GB     GPT                         │ │
            │ │  da0p1    33 MB     efi                         │ │
            │ │  da0p2    3.0 GB    freebsd-ufs                 │ │
            │ │                                                 │ │
            │ │                                                 │ │
            │ │                                                 │ │
            │ └─────────────────────────────────────────────────┘ │
            ├─────────────────────────────────────────────────────┤
            │[Create] [Delete] [Modify] [Revert] [ Auto ] [Finish]│
            └─────────────────────────────────────────────────────┘
Partition editor - confirmation
Select Commit and press Enter to continue with writing out a new partition table:
            ┌─────────────────┤Partition Editor├──────────────────┐
            │ Please review the disk setup. When complete, press  │
            │ the Finish button.                                  │
            │                                                     │
            │                                                     │
            │ ┌─────────────────────────────────────────────────┐ │
            │ │┌────────────────┤Confirmation├─────────────────┐│ │
            │ ││ Your changes will now be written to disk. If  │  │
            │ ││ you have chosen to overwrite existing data,   │  │
            │ ││ it will be PERMANENTLY ERASED. Are you sure   │  │
            │ ││ you want to commit your changes?              │  │
            │ │├───────────────────────────────────────────────┤  │
            │ ││[   Commit    ] [Revert & Exit] [    Back     ]│  │
            │ │└───────────────────────────────────────────────┘  │
            │ │                                                   │
            │ │                                                 │ │
            │ └─────────────────────────────────────────────────┘ │
            ├─────────────────────────────────────────────────────┤
            │[Create] [Delete] [Modify] [Revert] [ Auto ] [Finish]│
            └─────────────────────────────────────────────────────┘
The installation proceeds
The installer will now proceed to check distribution files and unpack them onto the disk. Unless something goes wrong, no user interaction is required. Typical output from the installation process will look like this:
┌───────────────────────────┤Checksum Verification├──────────────────────────┐
│ base.txz                                                   [ In Progress ] │
│ kernel.txz                                                 [   Pending   ] │
│ base-dbg.txz                                               [   Pending   ] │
│ kernel-dbg.txz                                             [   Pending   ] │
│ kernel.GENERIC-MORELLO-NOCAPREVOKE-NODEBUG-dbg.txz         [   Pending   ] │
│ kernel.GENERIC-MORELLO-NOCAPREVOKE-NODEBUG.txz             [   Pending   ] │
│ kernel.GENERIC-MORELLO-NOCAPREVOKE-dbg.txz                 [   Pending   ] │
│ kernel.GENERIC-MORELLO-NOCAPREVOKE.txz                     [   Pending   ] │
│ kernel.GENERIC-MORELLO-NODEBUG-dbg.txz                     [   Pending   ] │
│ kernel.GENERIC-MORELLO-NODEBUG.txz                         [   Pending   ] │
│ kernel.GENERIC-MORELLO-PURECAP-BENCHMARK-NOCAPREVOKE-NO... [   Pending   ] │
│ kernel.GENERIC-MORELLO-PURECAP-BENCHMARK-NOCAPREVOKE-NO... [   Pending   ] │
│ kernel.GENERIC-MORELLO-PURECAP-BENCHMARK-NOCAPREVOKE-db... [   Pending   ] │
│ ...                                                                        │
│                                                                            │
│ Verifying checksums of selected distributions.                             │
│                                                                            │
│  ┌─Overall Progress─────────────────────────────────────────────────────┐  │
│  │                                   0%                                 │  │
│  └──────────────────────────────────────────────────────────────────────┘  │
└────────────────────────────────────────────────────────────────────────────┘
Updating the EFI configuration table
If you are reinstalling a Morello box with an existing OS install, you may be prompted to update the boot configuration. Press Enter to proceed:
                    ┌────────┤Boot Configuration├────────┐
                    │ There are multiple "FreeBSD" EFI   │
                    │ boot entries. Would you like to    │
                    │ remove them all and add a new one? │
                    ├────────────────────────────────────┤
                    │        [ Yes  ]     [  No  ]       │
                    └────────────────────────────────────┘
Setting a root password
Enter a new root password and press Enter. Then confirm it by typing the same password again and pressing Enter.
Please select a password for the system management account (root):
Typed characters will not be visible.
Changing local password for root
New Password:
Network configuration
If desired, configure Ethernet networking by pressing Enter.
      ┌─────────────────────┤Network Configuration├─────────────────────┐
      │ Please select a network interface to configure:                 │
      │ ┌─────────────────────────────────────────────────────────────┐ │
      │ │re0 RealTek 8168/8111 B/C/CP/D/DP/E/F/G PCIe Gigabit Ethernet│ │
      │ └─────────────────────────────────────────────────────────────┘ │
      ├─────────────────────────────────────────────────────────────────┤
      │                      [  OK  ]     [Cancel]                      │
      └─────────────────────────────────────────────────────────────────┘
Network configuration - enabling IPv4
If desired, enable IPv4 on the Ethernet interface by selecting Yes and pressing Enter:
                        ┌───┤Network Configuration├───┐
                        │ Would you like to configure │
                        │ IPv4 for this interface?    │
                        ├─────────────────────────────┤
                        │    [ Yes  ]    [  No  ]     │
                        └─────────────────────────────┘
Network configuration - DHCP for IPv4
If you will be using DHCP, select Yes and press Enter. Otherwise select No and press Enter to perform a manual IPv4 configuration.
                       ┌────┤Network Configuration├───┐
                       │ Would you like to use DHCP   │
                       │ to configure this interface? │
                       ├──────────────────────────────┤
                       │     [ Yes  ]    [  No  ]     │
                       └──────────────────────────────┘
Network configuration - enabling IPv6
If desired, enable IPv6 on the Ethernet interface by selecting Yes and pressing Enter:
                        ┌───┤Network Configuration├───┐
                        │ Would you like to configure │
                        │ IPv6 for this interface?    │
                        ├─────────────────────────────┤
                        │    [ Yes  ]    [  No  ]     │
                        └─────────────────────────────┘
Network configuration - SLAAC for IPv6
Press Enter to use stateless address autoconfiguration for IPv6:
                      ┌─────┤Network Configuration├─────┐
                      │ Would you like to try stateless │
                      │ address autoconfiguration       │
                      │ (SLAAC)?                        │
                      ├─────────────────────────────────┤
                      │      [ Yes  ]     [  No  ]      │
                      └─────────────────────────────────┘
Network configuration - resolver configuration
Enter DNS resolution configuration information, or press Enter to confirm autoconfigured DNS configuration:
    ┌───────────────────────┤Network Configuration├───────────────────────┐
    │ Resolver Configuration                                              │
    │ ┌─────────────────────────────────────────────────────────────────┐ │
    │ │Search         localdomain                                       │ │
    │ │IPv6 DNS #1                                                      │ │
    │ │IPv6 DNS #2                                                      │ │
    │ │IPv4 DNS #1    192.168.1.1                                       │ │
    │ │IPv4 DNS #2                                                      │ │
    │ └─────────────────────────────────────────────────────────────────┘ │
    ├─────────────────────────────────────────────────────────────────────┤
    │                        [  OK  ]     [Cancel]                        │
    └─────────────────────────────────────────────────────────────────────┘
Local or UTC clock
Press Enter to select a system clock on UTC:
   ┌───────────┤Select local or UTC (Greenwich Mean Time) clock├───────────┐
   │ Is this machine's CMOS clock set to UTC?  If it is set to local time, │
   │ or you don't know, please choose NO here!                             │
   │                                                                       │
   ├───────────────────────────────────────────────────────────────────────┤
   │                          [ Yes  ]   [  No  ]                          │
   └───────────────────────────────────────────────────────────────────────┘
Timezone selection
Press Enter to select UTC as your timezone; otherwise, select your continent and press Enter.
                      ┌──────┤Time Zone Selector├───────┐
                      │ Select a region                 │
                      │ ┌─────────────────────────────┐ │
                      │ │0  UTC                       │ │
                      │ │1  Africa                    │ │
                      │ │2  America -- North and South│ │
                      │ │3  Antarctica                │ │
                      │ │4  Arctic Ocean              │ │
                      │ │5  Asia                      │ │
                      │ │6  Atlantic Ocean            │ │
                      │ │7  Australia                 │ │
                      │ │8  Europe                    │ │
                      │ │9  Indian Ocean              │ │
                      │ │10 Pacific Ocean             │ │
                      │ └─────────────────────────────┘ │
                      ├─────────────────────────────────┤
                      │      [  OK  ]     [Cancel]      │
                      └─────────────────────────────────┘
If you have not selected UTC, select your country and press Enter:
        ┌────────────────────┤Countries in Europe├────────────────────┐
        │ Select a country or region                                  │
        │ ┌─^^^─────────────────────────────────────────────────────┐ │
        │ │ 35 Poland                                               │ │
        │ │ 36 Portugal                                             │ │
        │ │ 37 Romania                                              │ │
        │ │ 38 Russian Federation                                   │ │
        │ │ 39 San Marino                                           │ │
        │ │ 40 Serbia                                               │ │
        │ │ 41 Slovakia                                             │ │
        │ │ 42 Slovenia                                             │ │
        │ │ 43 Spain                                                │ │
        │ │ 44 Svalbard and Jan Mayen                               │ │
        │ │ 45 Sweden                                               │ │
        │ │ 46 Switzerland                                          │ │
        │ │ 47 Turkey                                               │ │
        │ │ 48 Ukraine                                              │ │
        │ │ 49 United Kingdom of Great Britain and Northern Ireland │ │
        │ │ 50 Åland Islands                                        │ │
        │ └────────────────────────────────────────────────100%─────┘ │
        ├─────────────────────────────────────────────────────────────┤
        │                     [  OK  ]   [Cancel]                     │
        └─────────────────────────────────────────────────────────────┘
Confirm your choice by selecting Yes and pressing Enter:
   ┌────────────────────────────┤Confirmation├────────────────────────────┐
   │ Does the abbreviation `UTC' look reasonable?                         │
   ├──────────────────────────────────────────────────────────────────────┤
   │                         [ Yes  ]     [  No  ]                        │
   └──────────────────────────────────────────────────────────────────────┘
Setting the date and time
As desired, set the date, or select Skip and press Enter if you plan to use network time synchronization:
                   ┌─────────────┤Time & Date├────────────┐
                   │  Month            Year               │
                   │  ┌───────────────┐┌───────────────┐  │
                   │  │           July││           2024│  │
                   │  └───────────────┘└───────────────┘  │
                   │  ┌────────────────────────────────┐  │
                   │  │    Sun Mon Tue Wed Thu Fri Sat │  │
                   │  │         1   2   3   4   5   6  │  │
                   │  │     7   8   9  10  11  12  13  │  │
                   │  │    14  15  16  17  18  19  20  │  │
                   │  │    21  22  23  24  25  26  27  │  │
                   │  │    28  29  30  31              │  │
                   │  │                                │  │
                   │  └────────────────────────────────┘  │
                   ├──────────────────────────────────────┤
                   │       [Set Date]     [  Skip  ]      │
                   └──────────────────────────────────────┘
And, likewise, the time:
                   ┌─────────────┤Time & Date├────────────┐
                   │            ┌──┐ ┌──┐ ┌──┐            │
                   │            │11│:│23│:│20│            │
                   │            └──┘ └──┘ └──┘            │
                   ├──────────────────────────────────────┤
                   │       [Set Time]     [  Skip  ]      │
                   └──────────────────────────────────────┘
System configuration
As desired, enable any further services (e.g., ntpd and ntpd_sync_on_start) by
selecting them and hitting Space:
┌───────────────────────────┤System Configuration├───────────────────────────┐
│ Choose the services you would like to be started at boot:                  │
│ ┌────────────────────────────────────────────────────────────────────────┐ │
│ │[ ] local_unbound      Local caching validating resolver                │ │
│ │[X] sshd               Secure shell daemon                              │ │
│ │[ ] moused             PS/2 mouse pointer on console                    │ │
│ │[ ] ntpd               Synchronize system and network time              │ │
│ │[ ] ntpd_sync_on_start Sync time on ntpd startup, even if offset is high│ │
│ │[ ] powerd             Adjust CPU frequency dynamically if supported    │ │
│ │[X] dumpdev            Enable kernel crash dumps to /var/crash          │ │
│ │[ ] debugger_on_panic  Run debugger on kernel panic                     │ │
│ └────────────────────────────────────────────────────────────────────────┘ │
├────────────────────────────────────────────────────────────────────────────┤
│                                  [  OK  ]                                  │
└────────────────────────────────────────────────────────────────────────────┘
Then press Enter to continue.
Add user accounts
If you plan to install the desktop environment in the next step, it is useful to create user accounts now. If desired, select Yes and press Enter to add non-root accounts. Otherwise, select No and press Enter
                       ┌──────┤Add User Accounts├─────┐
                       │ Would you like to add users  │
                       │ to the installed system now? │
                       ├──────────────────────────────┤
                       │     [ Yes  ]    [  No  ]     │
                       └──────────────────────────────┘
If you add non-root users, we recommend adding them to the wheel,
operator, and video groups to allow them to manage the system as well as
use the desktop environment.
CHERI Desktop environment
If you wish to configure your CheriBSD system with a KDE-based desktop environment you can do so now. NOTE: You must have previously configured the network and be able to reach pkg.CheriBSD.org.
                      ┌─────────┤CHERI Desktop├────────┐
                      │ Would you like to install the  │
                      │ CHERI desktop environment      │
                      │ (requires network)?            │
                      ├────────────────────────────────┤
                      │      [ Yes  ]     [  No  ]     │
                      └────────────────────────────────┘
Select Yes to install (NOTE: this may take 20-50 minutes depending on network conditions).
Virtualization support
If you wish to configure your CheriBSD system to support bhyve-based,
CHERI-enabled virtual machines, press Enter:
                      ┌───────┤CHERI VM Support├────────┐
                      │ Would you like to install CHERI │
                      │ virtual machine support         │
                      │ (requires network)?             │
                      ├─────────────────────────────────┤
                      │      [ Yes  ]     [  No  ]      │
                      └─────────────────────────────────┘
Final configuration
If there are further configuration settings to change, use the up/down arrow keys to highlight an appropriate option from the menu, then use the left arrow key to select the Select button and press Enter. Otherwise, press Enter to complete the installation:
┌────────────────────────────┤Final Configuration├───────────────────────────┐
│ Setup of your FreeBSD system is nearly complete. You can now modify your   │
│ configuration choices. After this screen, you will have an opportunity to  │
│ make more complex changes using a shell.                                   │
│ ┌────────────────────────────────────────────────────────────────────────┐ │
│ │Add User         Add a user to the system                               │ │
│ │Root Password    Change root password                                   │ │
│ │Hostname         Set system hostname                                    │ │
│ │Network          Networking configuration                               │ │
│ │Services         Set daemons to run on startup                          │ │
│ │System Hardening Set security options                                   │ │
│ │Time Zone        Set system timezone                                    │ │
│ │Handbook         Install FreeBSD Handbook (requires network)            │ │
│ │CHERI Desktop    Install the CHERI desktop environment (requires network│ │
│ │CHERI VM Support Install CHERI virtual machine support (requires network│ │
│ └────────────────────────────────────────────────────────────────────────┘ │
├────────────────────────────────────────────────────────────────────────────┤
│                            [Select]     [Finish]                           │
└────────────────────────────────────────────────────────────────────────────┘
Manual configuration
If desired, select Yes and press Enter to drop to a shell before reboot. Otherwise, select No and press Enter.
                 ┌──────────┤Manual Configuration├──────────┐
                 │ The installation is now finished. Before │
                 │ exiting the installer, would you like to │
                 │ open a shell in the new system to make   │
                 │ any final manual modifications?          │
                 ├──────────────────────────────────────────┤
                 │           [ Yes  ]     [  No  ]          │
                 └──────────────────────────────────────────┘
Complete
Select Reboot and press Enter:
                  ┌───────────────┤Complete├────────────────┐
                  │ Installation of FreeBSD complete! Would │
                  │ you like to reboot into the installed   │
                  │ system now?                             │
                  ├─────────────────────────────────────────┤
                  │[  Reboot   ] [ Shutdown  ] [Live System]│
                  └─────────────────────────────────────────┘
Rebooting after installation
Remove the USB stick to prevent the installer from running after a system reboot. If you have issues with reliabity rebooting your Morello box, confirm that you are using a recent Morello firmware revision due to a known firmware bug in earlier versions that made OS-triggered reboot unreliable.
Logging in
Log in using the username root and the password you entered during the
installation process:
...
Performing sanity check on sshd configuration.
Starting sshd.
Starting cron.
Starting background file system checks in 60 seconds.
Starting sddm.

Sat Jul 20 00:12:09 UTC
CheriBSD/arm64 (cheribsd) (ttyu0)

login: root
Password:
Jul 20 00:12:13 cheribsd login[968]: ROOT LOGIN (root) ON ttyu0
FreeBSD 15.0-CURRENT (GENERIC-MORELLO-PURECAP) #0 releng/24.05-b2ad856aac65: Fri Jul 19 21:17:24 UTC 2024

Welcome to CheriBSD!

CheriBSD extends FreeBSD to implement memory protection and software
compartmentalization features enabled by CHERI-extended CPUs.

The CheriBSD front page:
  https://www.cheribsd.org/

We provide support via a mailing list:
  https://www.cl.cam.ac.uk/research/security/ctsrd/cheri/cheri-lists.html

And also via the CHERI-CPU Slack:
  https://www.cl.cam.ac.uk/research/security/ctsrd/cheri/cheri-slack.html

CheriBSD source may be found at:
  https://github.com/CTSRD-CHERI/cheribsd/

Find out more about about CHERI at https://cheri-cpu.org/

WARNING: INVARIANTS kernel option defined, expect reduced performance
WARNING: WITNESS kernel option defined, expect reduced performance
WARNING: capability revocation enabled by default, this may affect performance
root@cheribsd:~ #
You can now add further users, install SSH keys for remote access, install packages, and so on.
Morello known issues
The following known issues may affect the reliability and usability of CheriBSD on Morello:
-
If a USB hub is plugged in (including embedded hubs in USB keyboards) the system will pause on boot due to a firmware bug. Some people find they can bypass this pause by pressing Enter on a USB keyboard attached to the Morello desktop system. Others find they must unplug the hub to boot.
-
Sometimes the ATA controller starts timing out. and displaying messages like this on the console:
ahcich0: Timeout on slot 12 port 0
ahcich0: is 00000000 cs 00003000 ss 00000000 rs 00003000 tfd 50 serr 00000000 cmd 00718c17
(ada0:ahcich0:0:0:0): WRITE_DMA. ACB: ca 00 50 8a 8b 41 00 00 00 00 d0 00
(ada0:ahcich0:0:0:0): CAM status: Command timeout
(ada0:ahcich0:0:0:0): Retrying command, 3 more tries remain
A reboot usually cures the problem. If this happens during install, it's generally best to start over as performance is awful once timeouts start.
-
The HDMI transmitter on the board might fail to detect if a monitor is plugged in. In such a case, the monitor will turn blank when the CheriBSD kernel starts printing messages to the console, after the CheriBSD boot loader menu. A user can configure the kernel to ignore hot plug detection and assume that the attached monitor can receive HDMI input. To do that, add the following line to
/boot/loader.confand reboot your board:hw.tda19988.broken_hpd="1"While the screen itself should be working with this workaround, the user can still experience EDID reading failures described below.
-
The HDMI transmitter on the board might fail to detect the monitor's resolution. The CheriBSD kernel writes the following message to the console in such a case:
tda0: Failed to read EDIDCurrently, there is no workaround for this issue and it is likely to occur with the HDMI transmitter issue described above.
Issues with older firmware
The following issues affected users of older firmware revisions:
-
Due to a firmware bug, OS-triggered reboot may lead the system to hang when using older firmware. Update your firmware or use the "reboot" command on the management console to reboot the system once the OS has shut down.
-
Due to a firmware bug, some earlier firmware versions are not able to persist UEFI configuration variables. This affects, for example, the installation environment as the OS installer cannot instruct the firmware to boot only from the installed target, and not further USB sticks.
It is extremely important that you use the most recent firmware with your Morello board, to avoid these and other issues present in earlier firmware releases.
Third-party packages
CheriBSD on Morello ships with CheriABI, hybrid ABI and benchmark ABI packages (compilations) of the CheriBSD ports collection, each targeting a different form of code generation and Application Binary Interface (ABI). They have different levels of completeness, maturity, security, and support.
CheriBSD ports extends FreeBSD ports, a collection of over 34,000 third-party software adaptations to FreeBSD, with CHERI- and CheriBSD-specific patches. The releng/25.03 CheriBSD ports branch contains ports matching the packages built for the current release.
Overview
The following table presents an overview of available package managers in CheriBSD that are described in more details in consecutive sections. You can also browse package repositories at pkg.CheriBSD.org to check what packages are available for a specific ABI version.
| ABI | # | Manager | Install path | Suitable for |
|---|---|---|---|---|
| CheriABI | ~10,000 | pkg64c | /usr/local | Security evaluation |
| Benchmark ABI | ~10,000 | pkg64cb | /usr/local64cb | Performance evaluation |
| Hybrid ABI | ~25,000 | pkg64 | /usr/local64 | Day-to-day use |
Package managers in CheriBSD
Note: As of this writing we only provide packages for Morello systems.
CheriBSD includes three package managers:
pkg64cfor CheriABI packages;pkg64cbfor benchmark ABI packages;pkg64for hybrid ABI packages.
The FreeBSD package manager pkg is not available on CheriBSD.
We expect that pkg64c will be renamed to pkg in a future CheriBSD release.
The intention is that, over time, the CheriABI packages will become more
mature, and hence the preferred collection for day-to-day use.
The syntax of the pkg64* commands match the syntax of the pkg
command from FreeBSD.
You can find information on package manager commands in FreeBSD's pkg manual
pages shipped with CheriBSD, e.g. for the commands pkg64 rquery and
pkg64c rquery, execute man pkg-rquery.
Additionally, you can learn more about FreeBSD's package manager by reading the pkg(8) manual page online and the FreeBSD Handbook chapter on packages and ports.
CheriABI packages
CheriABI packages are compiled using pure-capability CHERI C/C++, and employ fine-grained C/C++ memory protection.
These packages are considered appropriate for experimental use and a security evaluation of CHERI-extended hardware-software stacks. Their primary function is to provide necessary dependencies for efforts to port software to CheriABI and to support CHERI demonstration and evaluation. They are suitable for research and development of software that benefit from spatial and temporal memory safety as well as software compartmentalisation. They can also be used to investigate potential memory safety issues in third-party software that are easier to detect and debug using a CHERI-enabled hardware-software stack.
There are currently ~10,000 CheriABI packages available, including:
-
Databases:
sqlite3; -
Development utilities:
autoconf,chericat,cmake,git,gmake; -
Editors:
nano,vim-tiny; -
GUI environment:
cheri-desktop(seatd,sddm,wayland,plasma5-plasma-workspace,dolphin,kate,konsole,okular); -
Hypervisor tools:
cheri-vm-support(u-boot-bhyve-arm64); -
Language interpreters:
perl5,tcl86; -
Libraries:
libnghttp2,libressl,libssh2,lzlib; -
Networking tools:
rsync31; -
Shells:
bash,dash; -
System tools:
sudo,tmux.
The packages are installed in the standard /usr/local hierarchy as they match
the base system ABI.
Benchmark ABI packages
Benchmark ABI packages are compiled similarly to CheriABI packages, but differ in generated code that takes into account current limitations of the Morello architecture. You should make sure to read the Benchmarking guidance section before using the benchmark ABI packages to understand the differences between CheriABI and the benchmark ABI.
These packages are considered appropriate for a performance evaluation of the Arm Morello architecture and third-party software executed on it. They should not be used for a security evaluation, in which case you should use CheriABI instead.
There are currently ~10,000 benchmark ABI packages available which should include almost all packages that are available in the CheriABI package repository.
The packages are installed in the /usr/local64cb hierarchy.
By default, /usr/local64cb/bin and /usr/local64cb/sbin are included in your
PATH environment variable of a shell shipped with CheriBSD.
If you are planning to use a custom shell, remember to add these paths to
PATH.
Different numbers of CheriABI and benchmark ABI packages is a result of using a
custom local base path (/usr/local64cb) and a custom LD_LIBRARY_PATH
variable name (LD_64CB_LIBRARY_PATH) for the benchmark ABI.
Multiple ports do not correctly handle these differences.
Hybrid ABI packages
Hybrid ABI packages are compiled almost identically to packages in the baseline non-CHERI architecture (e.g., Armv8-a for Morello, and 64-bit RISC-V for RISC-V), and do not have improvements in memory protection or software compartmentalization.
These packages are considered appropriate for day-to-day use. They are intended to provide stable versions of tools necessary to develop software and use your CHERI system while more software is ported to CheriABI.
There are currently ~25,000 hybrid ABI packages available, including:
-
Browsers:
chromium,firefox; -
Compilers:
-
llvm-morello;Includes Clang (a CHERI C/C++ compiler), LLD (a linker), and the LLVM infrastructure for the Arm Morello architecture. Binaries installed with this package have the suffix
-morello. -
llvm;Adds links in
/usr/local64/binto allow thellvm-morellopackage to be used as the default LLVM package, without the suffix-morello, e.g.clanginstead ofclang-morello. -
llvm-base;Adds links in
/usr/binto allow thellvmpackage to be used in place of a base-system toolchain. Theccscript installed with this package adds compiler flags required to natively compile code for a CHERI-enabled architecture. -
rust.
-
-
Debuggers:
gdb; -
Development utilities:
meson,ninja; -
Editors:
emacs; -
Language interpreters:
lua54,python39,ruby; -
Shells:
fish,zsh.
The packages are installed in the /usr/local64 hierarchy.
By default, /usr/local64/bin and /usr/local64/sbin are included in your
PATH environment variable of a shell shipped with CheriBSD.
If you are planning to use a custom shell, remember to add these paths to
PATH.
Limitations of packages
When using or even considering third-party software delivered with CheriBSD packages, it is important to keep in mind the maturity of currently available CheriABI packages, and potential conflicts between hybrid ABI and CheriABI packages. The following sections describe some of such limitations.
Maturity of CheriABI packages
There are many projects that must still be ported to CHERI in order to provide a fully-functional CheriABI package repository. The available CheriABI packages are also not continuously tested as part of the CheriBSD package building infrastructure.
CheriABI packages compile, but many have CHERI-related warnings that have not been audited, and only a limited set have been tested. Whilst the CheriABI packages are more interesting as they use CHERI memory-safety features, they might break at run time and hence might not be suitable for critical operations. In such cases, a corresponding hybrid ABI package might be better suited than the CheriABI package.
We expect the number of available and tested packages to grow with future CheriBSD releases, but it will take quite some time until we are able to provide a CheriABI package repository that covers functionalities currently included in the hybrid ABI package repository.
We encourage everyone to report bugs related to CHERI support in the CheriBSD ports issue tracker.
Separate local bases for ABIs
Upstream FreeBSD does not have the ability to manage packages for multiple ABIs
at the same time and its pkg package manager installs all packages in the
default local base path (/usr/local).
CheriBSD introduces a workaround for this issue by using separate local base
paths for different package repositories.
The hybrid ABI packages are compiled with a local base set to /usr/local64
while the CheriABI packages use the default local base.
Because the hybrid ABI packages are installed in a non-standard location, there
may be bugs resulting in hybrid ABI packages looking for its dependencies in
/usr/local instead of /usr/local64.
For example, a CheriBSD port a package was built from might fail to configure
a project's build system to use this custom local base, or an upstream project
might hardcode /usr/local in its source code.
We encourage everyone to report bugs related to invalid local base paths in the hybrid ABI packages in our CheriBSD ports issue tracker.
Cross-ABI package conflicts
Hybrid ABI and CheriABI package repositories include many counterpart packages,
e.g. git is available in both repositories.
CheriABI packages have a higher priority than the hybrid ABI packages in default
PATH environment variables in CheriBSD.
If you install a CheriABI package and a hybrid ABI package with a conflicting
program name, you must execute the hybrid ABI program using an absolute path by
default.
When using a shell configuration not included in CheriBSD's source code, a user
must remember to appropriately set the PATH environment variable to take into
account both /usr/local and /usr/local64 paths.
The user can set the order of the paths they prefer but it is recommended to
place /usr/local before /usr/local64 in such configurations to match
CheriBSD's defaults.
Cross-ABI package dependencies
At the moment, a package cannot depend at run time on another package with a different ABI, e.g. to execute a program provided by that package. Such a feature would be useful for CheriBSD ports which cannot easily be adapted to CheriABI and which include programs that could be executed by other ports already adapted to CheriABI. There are currently no plans to support this case.
Missing packages
Hybrid ABI and CheriABI package repositories might be missing third-party software due to the following reasons:
-
There is no FreeBSD port including that software or it is broken on AArch64;
Check FreshPorts, FreeBSD Wiki, FreeBSD Bugzilla and the freebsd-ports mailing list to find out if anyone is working on software you are interested in.
-
A CheriBSD port with the software is broken on Morello (e.g., it is not adapted to CheriABI), or does not respect a custom local base (
/usr/local64) when compiled for the hybrid ABI.Check the CheriBSD ports issue tracker to find out if an issue with the software is documented and the Poudriere infrastructure for CheriBSD packages to find failed build logs and skipped build causes.
Upgrading packages
It is recommended to upgrade packages in the following situations:
-
Before building a newer CheriBSD release;
The release might require an updated toolchain (e.g., due to ABI changes in the release that must be supported by the toolchain).
-
After updating your host to a newer CheriBSD release;
Package repositories are compiled for the ABI version used by the corresponding release, which might differ from the ABI of the previous release.
Where practical, we intend to support packages from the immediately prior release on the newer release, but will make no effort to ensure that package repositories from even older releases continue to work.
Additionally, package repositories for the newer release will most likely include updated third-party software versions that are tested against that release.
-
After finding a bug in a package (e.g., a library, a toolchain).
It might happen that the bug you discovered has already been reported and fixed. If the package upgrade does not resolve your issue, please report the bug.
Use the following commands to upgrade your packages:
| CheriABI | Hybrid ABI |
|---|---|
pkg64c upgrade | pkg64 upgrade |
If you do not want perform the upgrade itself but only check if newer versions
are available, use the -n flag:
| CheriABI | Hybrid ABI |
|---|---|
pkg64c upgrade -n | pkg64 upgrade -n |
You can read more on the upgrade command at
pkg-upgrade(8)
or in your console with man pkg-upgrade.
Debugging packages
Similarly to the FreeBSD Project, CheriBSD packages are built with CheriBSD ports that are based on FreeBSD ports. By default, the packages are built with optimisation levels defined in CheriBSD ports or upstream third-party software projects. Unfortunately, the FreeBSD ports build system does not allow to build ports with optimisations and debug symbols at the same time. As a consequence of that, you might discover that debug symbols are missing when debugging a program with the GDB debugger.
In order to allow users to use optimised and debug CheriABI packages, CheriBSD
provides two package repositories with them: the default repository with
optimisations and without debug symbols called CheriBSD, and the debug
repository without optimisations and with debug symbols called CheriBSD-debug.
Note that we do not provide debug packages for the hybrid and benchmark ABIs.
You can enable the debug repository by first creating a directory for custom package repository configuration files:
mkdir -p /usr/local/etc/pkg/repos
and then creating a configuration file that enables CheriBSD-debug:
echo "CheriBSD-debug: { enabled: yes }" >/usr/local/etc/pkg/repos/CheriBSD-debug.conf
You can reinstall all previously installed default packages to replace them with debug packages:
pkg64c upgrade -fr CheriBSD-debug
Alternatively, you can selectively reinstall a package:
pkg64c upgrade -r CheriBSD-debug <pkg-name>
However, keep in mind that in such case only the package you list is reinstalled, leaving its dependencies intact.
Once you enable the CheriBSD-debug repository, the CheriBSD repository is
used by default.
You have to use the -r flag to switch to CheriBSD-debug in a pkg64c
command, e.g.:
pkg64c install -r CheriBSD-debug <pkg-name>
If you want to use only the CheriBSD-debug repository, you can create a
configuration file that disables the CheriBSD repository:
echo "CheriBSD: { enabled: no }" > /usr/local/etc/pkg/repos/CheriBSD.conf
You can also check if an installed package was fetched from the default or debug package repository:
pkg64c query '%n %R' <pkg-name>
You can omit <pkg-name> in the above command to list all packages with their
repositories.
Useful commands
The following list includes useful commands to manage packages.
Replace <pkg> with pkg64c to execute a command in the context of CheriABI
packages and with pkg64 in the context of hybrid ABI packages.
Most pkg commands have separate man pages describing them.
For a command <pkg> foo, you can read its man page by executing man pkg-foo
on a CheriBSD host.
- List available package manager commands:
<pkg> help - Read more information on a package manager command:
<pkg> help <command> - Search a package repository:
<pkg> search <pattern> - Search a package repository and display full information:
<pkg> search --full <pattern> - List installed packages:
<pkg> info - Display information for an installed package:
<pkg> info <pkg-name> - Install a package:
<pkg> install <pkg-name> - Delete a package:
<pkg> delete <pkg-name> - Delete packages that are no longer required:
<pkg> autoremove - Check a new package version for an installed package:
<pkg> upgrade -n <pkg-name> - Check new package versions for all installed packages:
<pkg> upgrade -n - Upgrade a package after confirmation:
<pkg> upgrade <pkg-name> - Upgrade all packages after confirmation:
<pkg> upgrade - Display which package installed a file:
<pkg> which /path/to/file - Check a number of installed packages:
<pkg> stats -l - Check a number of available packages:
<pkg> stats -r
Compiling "Hello World"
These instructions are intended for use on an Arm Morello board, and install
hybrid ABI versions of key toolchain and utilities using pkg64.
The commands will (eventually) work the same on CHERI-RISC-V, but output
details and registers in GDB will differ.
Toolchain installation
You will need the Morello LLVM toolchain and Morello GDB for this exercise. To install LLVM, use the command:
pkg64 install llvm-base
If this is the first time you are using pkg64 on this system, you will
be prompted to bootstrap the pkg package before the package database
is downloaded and you are prompted to confirm before installing llvm
and its dependencies:
root@cheribsd:~ # pkg64 install llvm-base
The package management tool is not yet installed on your system.
Do you want to fetch and install it now? [y/N]: y
Bootstrapping pkg from pkg+http://pkg.CheriBSD.org/CheriBSD:20220314:aarch64, please wait...
Verifying signature with trusted certificate pkg.cheribsd.org.2022032901... done
Installing pkg-1.17.5_1...
Extracting pkg-1.17.5_1: 100%
Updating CheriBSD repository catalogue...
Fetching meta.conf: 100%    163 B   0.2kB/s    00:01
Fetching packagesite.pkg: 100%    4 MiB   1.4MB/s    00:03
Processing entries: 100%
CheriBSD repository update completed. 20954 packages processed.
All repositories are up to date.
Updating database digests format: 100%
The following 12 package(s) will be affected (of 0 checked):

New packages to be INSTALLED:
        gettext-runtime: 0.21
        indexinfo: 0.3.1
        libedit: 3.1.20210910,1
        libffi: 3.3_1
        libxml2: 2.9.13_2
        llvm: 13,1
        llvm-base: 1
        llvm-morello: 13.0.d20220502_1
        mpdecimal: 2.5.1
        perl5: 5.32.1_1
        python38: 3.8.13
        readline: 8.1.2

Number of packages to be installed: 12

The process will require 902 MiB more space.
190 MiB to be downloaded.

Proceed with this action? [y/N]: y
[1/12] Fetching llvm-base-1.pkg: 100%    3 KiB   2.8kB/s    00:01
[2/12] Fetching llvm-13,1.pkg: 100%   11 KiB  11.2kB/s    00:01
...
[12/12] Fetching libedit-3.1.20210910,1.pkg: 100%  119 KiB 121.8kB/s    00:01
Checking integrity... done (0 conflicting)
[1/12] Installing indexinfo-0.3.1...
[1/12] Extracting indexinfo-0.3.1: 100%
...
[12/12] Installing llvm-base-1...
[12/12] Extracting llvm-base-1: 100%
=====
...
Note: By default FreeBSD ships with the vi and ee editors. You may
wish to install the nano or vim package to access a
more familiar editor. Currently only hybrid packages installable with
pkg64 are available.
Source code
#include <stdio.h>

int
main(void)
{
	printf("Hello world\n");
}
Building for CheriABI
To build a CheriABI Hello World program use:
cc -g -O2 -Wall -o helloworld helloworld.c
You can verify this is a CheriABI binary with the file command:
root@cheribsd:~ # file helloworld
helloworld: ELF 64-bit LSB pie executable, ARM aarch64, C64, CheriABI, version 1 (SYSV), dynamically linked, interpreter /libexec/ld-elf.so.1, for FreeBSD 14.0 (1400094), FreeBSD-style, with debug_info, not stripped
Building for the Benchmark ABI
To target the Benchmark ABI, add the argument
-mabi=purecap-benchmark to the cc command line:
cc -g -O2 -Wall -mabi=purecap-benchmark -o helloworld helloworld.c
You can verify this is a Benchmark ABI binary with the file command:
root@cheribsd:~ # file helloworld
helloworld: ELF 64-bit LSB pie executable, ARM aarch64, C64, CheriABI, version 1 (SYSV), dynamically linked, interpreter /libexec/ld-elf.so.1, for FreeBSD 14.0 (1400094), FreeBSD-style, pure-capability benchmark ABI, with debug_info, not stripped
Running
Run the program:
root@cheribsd:~ # ./helloworld
Hello world
Debugging
First, if it is not already installed, install the CHERI GDB debugger:
pkg64 install gdb-cheri
You can then debug helloworld by running GDB and setting a breakpoint
on main:
root@cheribsd:~ # gdb ./helloworld
GNU gdb (GDB) 12.1
...
Reading symbols from ./helloworld...
...
(gdb) b main
Breakpoint 1 at 0x10a14: file helloworld.c, line 6.
(gdb) r
Starting program: /root/helloworld

Breakpoint 1, main () at helloworld.c:6
6           printf("Hello world\n");
(gdb)
If you then step into the printf (or puts depending on
optimization level) call you will see that GDB prints the capability
argument with expanded information including bounds and permissions:
(gdb) s
puts (s=0x1006e0 [rR,0x1006e0-0x1006ec] "Hello world")
    at /home/bed22/cheri/cheribsd/lib/libc/stdio/puts.c:60
60      /home/bed22/cheri/cheribsd/lib/libc/stdio/puts.c: No such file or directory.
The argument can also be examined directly as either an integer or capability register:
(gdb) info reg x0
x0             0x1006e0            1050336
(gdb) info reg c0
c0             0x905f400046ec06e000000000001006e0 0x1006e0 [rR,0x1006e0-0x1006ec]
(gdb)
If a capability (either in memory or a register) contains a null-derived value, it is displayed as a simple scalar value without any attributes. If a capability is not null-derived but is untagged, the string "(invalid)" is displayed after the bounds.
Capability tags in memory can also be examined by passing the "m" flag to the eXamine command. For example, compare the output of the internal FILE structure used for stdout in libc:
(gdb) p *__stdoutp
$1 = {_p = 0x0, _r = 0, _w = 0, _flags = 8, _file = 1, _bf = {_base = 0x0,
    _size = 0}, _lbfsize = 0,
  _cookie = 0x403a8400 [rwRWE,0x403a8230-0x403a87a0],
  _close = 0x402bade5 <__sclose> [rxRE,0x4018e000-0x407f0000] (sentry),
  _read = 0x402bada5 <__sread> [rxRE,0x4018e000-0x407f0000] (sentry),
  _seek = 0x402baddd <__sseek> [rxRE,0x4018e000-0x407f0000] (sentry),
  _write = 0x402badc1 <__swrite> [rxRE,0x4018e000-0x407f0000] (sentry), _ub = {
    _base = 0x0, _size = 0}, _up = 0x0, _ur = 0, _ubuf = "\000\000",
  _nbuf = "", _lb = {_base = 0x0, _size = 0}, _blksize = 0, _offset = 0,
  _fl_mutex = 0x0, _fl_owner = 0x0, _fl_count = 0, _orientation = 0,
  _mbstate = {__mbstate8 = '\000' <repeats 127 times>, _mbstateL = 0,
    _mbstateP = 0x0 }, _flags2 = 0}
(gdb) x/16gxm __stdoutp
<CHERI Tag 0 for range [0x403a8400,0x403a8410)>
0x403a8400:     0x0000000000000000      0x0000000000000000
<CHERI Tag 0 for range [0x403a8410,0x403a8420)>
0x403a8410:     0x0000000000000000      0x0000000000010008
<CHERI Tag 0 for range [0x403a8420,0x403a8430)>
0x403a8420:     0x0000000000000000      0x0000000000000000
<CHERI Tag 0 for range [0x403a8430,0x403a8440)>
0x403a8430:     0x0000000000000000      0x0000000000000000
<CHERI Tag 0 for range [0x403a8440,0x403a8450)>
0x403a8440:     0x0000000000000000      0x0000000000000000
<CHERI Tag 1 for range [0x403a8450,0x403a8460)>
0x403a8450:     0x00000000403a8400      0xdc5fc00047a08230
<CHERI Tag 1 for range [0x403a8460,0x403a8470)>
0x403a8460:     0x00000000402bade5      0xb05fc000bf0618e7
<CHERI Tag 1 for range [0x403a8470,0x403a8480)>
0x403a8470:     0x00000000402bada5      0xb05fc000bf0618e7
Benchmarking guidance
CheriBSD is a research operating system designed to run on experimental hardware. In this section, we provide high-level guidance on configuring CheriBSD for software benchmarking.
Framing
The expectation of this section is that a performance comparison is being made between baseline aarch64-compiled software (64-bit Arm) and memory-safe aarch64c software (CheriABI) on the Arm Morello board.
Before proceeding to the remainder of this section, it is essential to first read Early performance results from the prototype Morello microarchitecture. That document provides detailed information on how to interpret performance measurements, including documenting known limitations of the prototype Morello microarchitecture.
A key conclusion from that work is that CheriABI software being used for performance measurement should be compiled for the aarch64cb "Benchmark ABI", and not aarch64c.
Kernel configuration
Depending on the version of CheriBSD you are using, the kernel may have a
number of debugging fetures enabled.
These features can substantially impact system performance, including
inducing disproportionate performance overhead for specific system behaviours.
For example, enabling kernel lock-order checking ("WITNESS") will introduce
substantial overhead, and in particular will impact kernel-centric workloads
that make more intensive use of locks, such as networking.
During boot, CheriBSD will add the following lines to /etc/motd, which will
be displayed at login, to warn you about the "INVARIANTS" and "WITNESS"
debugging features:
WARNING: INVARIANTS kernel option defined, expect reduced performance
WARNING: WITNESS kernel option defined, expect reduced performance
Performance measurements employing a hybrid kernel should use the
kernel.GENERIC-MORELLO-NODEBUG configuration when kernel memory safety is
not required.
The following line can be added to /boot/loader.conf:
kernel="kernel.GENERIC-MORELLO-NODEBUG"
Measurements requiring a memory-safe kernel should use the
kernel.GENERIC-MORELLO-PURECAP-NODEBUG configuration.
The following can be added to /boot/loader.conf:
kernel="kernel.GENERIC-MORELLO-PURECAP-NODEBUG"
You will need to reboot in order for this change to take effect.
Heap temporal memory safety
Since CheriBSD 23.11, userlevel heap temporal safety is enabled by default with jemalloc as the memory allocator.
This support is experimental, and has not yet been through significant
performance analysis and optimization.
We recommend disabling temporal safety support for the full system during
benchmarking not specifically intended to capture temporal safety
performance.
During boot, CheriBSD will add the following line to /etc/motd, which will
be displayed at login, to warn you about the temporal safety feature:
WARNING: capability revocation enabled by default, this may affect performance
The following line can be added to /boot/loader.conf:
security.cheri.runtime_revocation_default=0
You will need to reboot in order for this change to take effect.
The Benchmark ABI
Since CheriBSD 23.11, CheriBSD supports the Benchmark ABI, a modified form of
code generation improving performance on the Arm Morello board.
This is required due to limitations on bounds prediction in the current
Morello prototype, which would be resolved in a production microarchitecture.
The performance of the Benchmark ABI is more predictive of potential future
CHERI microarchitectural performance than the Morello prototype running
software compiled for CheriABI, making it preferable for benchmarking.
However, this comes at the cost of reduce security, and so software compiled
for the Benchmark ABI should not be used for security evaluation.
Programs may be compiled to the Benchmark ABI using the
-mabi=purecap-benchmark command-line argument to cc.
More information on compiling with the Benchmark ABI can be found in Compiling Hello World. More information on what the Benchmark ABI is, and how to interpret performance results, can be found in Early performance results from the prototype Morello microarchitecture.
Getting help
CheriBSD is a community-supported open-source research operating system. While every effort has been made to engineer to a high quality, many aspects of OS design for CHERI processors remain active research, and there are constrained engineering resources available to build, maintain, and support the system. As you gain experience with CheriBSD, your help in supporting newcomers in the community will be greatly appreciated.
GitHub issue tracker and pull requests
CheriBSD is developed and maintained in the CheriBSD GitHub repository, which includes an issue tracker in which bugs can be reported, as well as permitting pull requests to be submitted.
This document is also maintained in a GitHub repository, and your feedback and improvements would be very much appreciated.
CheriBSD Slack on cheri-cpu.slack.com
Support for CheriBSD is provided via the CHERI CPU Slack, where a number of topic-specific channels can be found:
-
#cheribsd;CheriBSD, its features, releases and future plans.
-
#debuggers;GDB extended to support CHERI.
-
#qemu;QEMU-CHERI, QEMU system and user modes for Morello and CHERI-RISC-V.
-
#software-porting.Third-party software adaptations to CheriABI and CHERI-enabled achitectures, CheriBSD ports and Poudriere.
CheriBSD mailing lists
There are also several CheriBSD email lists available:
- CheriBSD announcement mailing list (low volume)
- CheriBSD general discussion
- CheriBSD ports and packages discussion
- CheriBSD security vulnerabilities contact address cl-cheribsd-security@lists.cam.ac.uk
In-person events and meetings
You can meet with the CheriBSD developers at a number of conferences and other events, including:
-
UKRI Digital Security by Design (DSbD) All Hands meetings that take place in the UK twice annually to discuss the Morello architecture, board, and its use.
-
FreeBSD developer summits and conferences around the world, including (when it takes place) the BSDCan conference in Canada, and the EuroBSDCon conference in Europe.
There is discussion around creating further, more frequent CHERI workshops in the UK in the future.
Most CheriBSD developers are based at the University of Cambridge (UK) and SRI International (USA), and it is possible to set up meetings with them directly. Get in touch if this would be useful to you.
Resources
In addition to the CheriBSD support channels, the following resources may also be useful.