Installing on a Morello Board
Please ensure that you have upgraded the Morello board firmware before proceeding to CheriBSD installation.
Once you have a disk image, you will either need to write it to a USB stick to boot an Arm Morello system, or specify it as an argument to an emulator such as QEMU-CHERI or the Arm Morello FVP.
Note that some screen shots in these instructions are from the 24.05 release, and will be updated soon.
Writing an installer disk image to a USB stick
If the image file you have downloaded is compressed (i.e., has a .xz
filename suffix), you will need to first decompress the image:
unxz cheribsd-memstick-arm64-aarch64c-25.03.img.xz
With appropriate substitutions of image filename and target device, the following command would write the image to a USB stick for use with a Morello board:
dd if=cheribsd-memstick-arm64-aarch64c-25.03.img of=/dev/DISK bs=1M
It is also possible to write a live image to a USB stick, with appropriate filename substitution.
On systems such as Ubuntu you can also use the GNOME Disks utility to write to a USB stick:
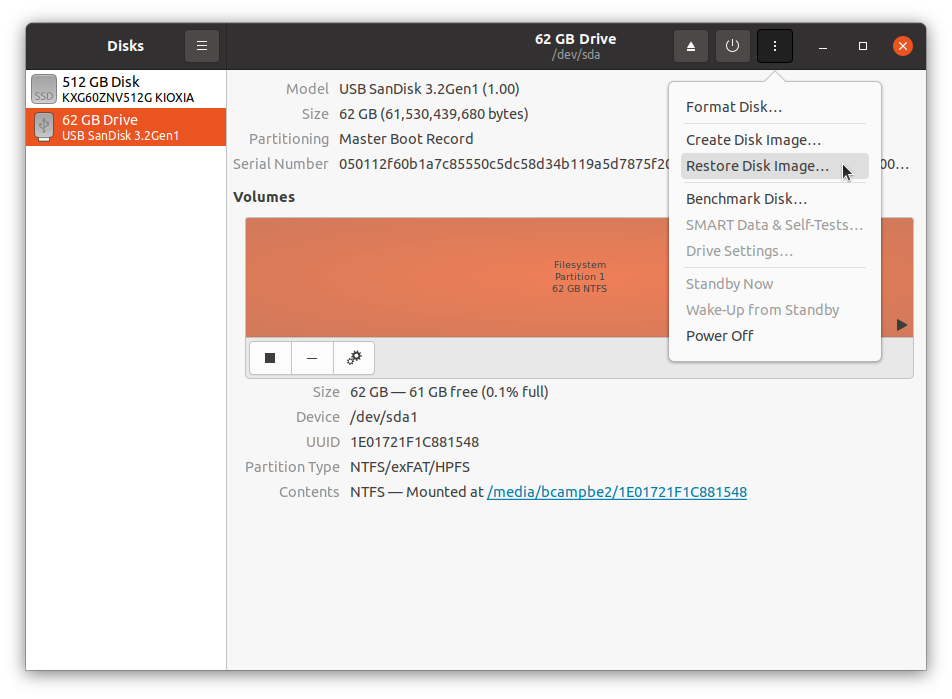
First select the USB stick in the left pane, then use the menu at the top right to select "Restore Disk Image...". It will ask for the image to write and confirm which device will be written to. Finally the eject icon can be used to safely remove the stick before use.
Installing an Arm Morello system
It is possible to use Arm Morello systems both by booting the live image on a USB stick, and also by installing to the internal hard disk. In this section, we describe the how to perform an installation using the memstick image.
Starting the boot
Before powering on your Morello board, ensure that the installer USB stick is inserted into one of the USB ports on the board. Use the power switch to power the board on, which should lead to firmware output on the MCC console during a multi-minute initialization and boot cycle.
Once that has completed, you will see Morello firmware output on the Morello console. When this message is presented, press Escape to enter the UEFI boot menu:
Press ESCAPE for boot options .......
At the UEFI menu, select Boot Manager using the cursor keys, and press Enter:
   Select Language            <Standard English>         This selection will
                                                         take you to the
 > Device Manager                                        Device Manager
 > Boot Manager
 > Boot Maintenance Manager

   Continue
   Reset


  ^v=Move Highlight       <Enter>=Select Entry
Select your USB stick from the Boot Manager menu using the cursor keys, and press enter. In the example below, it is the SanDisk Ultra USB 3.0 device:
/------------------------------------------------------------------------------\
|                                Boot Manager                                  |
\------------------------------------------------------------------------------/

                                                         Device Path :
   Boot Manager Menu                                     PcieRoot(0x0)/Pci(0x0,
                                                         0x0)/Pci(0x0,0x0)/Pci(
   UEFI Shell                                            0x14,0x0)/Pci(0x0,0x0)
   UEFI Misc Device                                      /USB(0x5,0x0)
   UEFI WDC WDS240G2G0A-00JH30 2143B2455605
   UEFI PXEv4 (MAC:0002F7009856)
   UEFI HTTPv4 (MAC:0002F7009856)
   UEFI HTTPv6 (MAC:0002F7009856)
   UEFI PXEv6 (MAC:0002F7009856)
   UEFI SanDisk Ultra USB 3.0
   0101cfbb32adfd6c145cd38e7d6164cd167456963c3a71b9f157
   e574567b43d96c6000000000000000000000e49dde42009f1a00
   955581079e275d95
   UEFI Non-Block Boot Device
                                                       v
/------------------------------------------------------------------------------\
|                                                                              |
| ^v=Move Highlight       <Enter>=Select Entry      Esc=Exit                   |
\------------------------------------------------------------------------------/
This will be followed by the CheriBSD boot loader and kernel output. You can press Enter to proceed, or wait for the countdown timer to finish:
    _____ _               _ ____   _____ _____
   / ____| |             (_)  _ \ / ____|  __ \
  | |    | |__   ___ _ __ _| |_) | (___ | |  | |
  | |    | '_ \ / _ \ '__| |  _ < \___ \| |  | |
  | |____| | | |  __/ |  | | |_) |____) | |__| |
   \_____|_| |_|\___|_|  |_|____/|_____/|_____/
                                                 ```                        `
                                                s` `.....---.......--.```   -/
 /---------- Welcome to CheriBSD ----------\    +o   .--`         /y:`      +.
 |                                         |     yo`:.            :o      `+-
 |  1. Boot Installer [Enter]              |      y/               -/`   -o/
 |  2. Boot Single user                    |     .-                  ::/sy+:.
 |  3. Escape to loader prompt             |     /                     `--  /
 |  4. Reboot                              |    `:                          :`
 |  5. Cons: Serial                        |    `:                          :`
 |                                         |     /                          /
 |  Options:                               |     .-                        -.
 |  6. Kernel: default/kernel (1 of 1)     |      --                      -.
 |  7. Boot Options                        |       `:`                  `:`
 |                                         |         .--             `--.
 |                                         |            .---.....----.
 \-----------------------------------------/
   Autoboot in 10 seconds. [Space] to pause
Note that seperate instances of the installer will run on both the video and serial consoles. Care should be taken to ensure that only one is used as no mechanism is implemented to prevent one from destroying the other's work.
On the serial console, you will eventually be prompted to select a terminal emulation type:
Welcome to FreeBSD!

Please choose the appropriate terminal type for your system.
Common console types are:
   ansi     Standard ANSI terminal
   vt100    VT100 or compatible terminal
   xterm    xterm terminal emulator (or compatible)

Console type [xterm]:
In most cases, simply hitting Enter will be the right thing to do.
This will enter bsdinstall, the interactive FreeBSD installer.
bsdinstall
bsdinstall uses the libdialog text interface library.
Be aware that you will sometimes need to use the space bar, and not enter
key, to select menu options, which many users find confusing.
Select Install at the first menu by hitting Enter:
                   ┌────────────────┤Welcome├────────────────┐
                   │ Welcome to FreeBSD! Would you like to   │
                   │ begin an installation or use the live   │
                   │ system?                                 │
                   ├─────────────────────────────────────────┤
                   │[  Install  ] [   Shell   ] [Live System]│
                   └─────────────────────────────────────────┘
Keymap selection
If you intend only to use the serial console, and not video console, select the default keymap by hitting Enter at the next menu; otherwise, use the cursor keys and space bar to select a country-specific keyboard layout:
       ┌───────────────────────┤Keymap Selection├────────────────────────┐
       │ The system console driver for FreeBSD defaults to standard "US" │
       │ keyboard map. Other keymaps can be chosen below.                │
       │ ┌─────────────────────────────────────────────────────────────┐ │
       │ │>>> Continue with default keymap                             │ │
       │ │->- Test default keymap                                      │ │
       │ │( ) Armenian phonetic layout                                 │ │
       │ │( ) Belarusian                                               │ │
       │ │( ) Belgian                                                  │ │
       │ │( ) Belgian (accent keys)                                    │ │
       │ │( ) Brazilian (accent keys)                                  │ │
       │ │( ) Brazilian (without accent keys)                          │ │
       │ │( ) Bulgarian (BDS)                                          │ │
       │ │( ) Bulgarian (Phonetic)                                     │ │
       │ │( ) Canadian Bilingual                                       │ │
       │ └─↓↓↓──────────────────────────────────────────────────── 41%─┘ │
       ├─────────────────────────────────────────────────────────────────┤
       │                      [Select]     [Cancel]                      │
       └────────────────── Press arrows, TAB or ENTER ───────────────────┘
Hostname
Press Enter to accept the default hostname, or replace it:
            ┌───────────────────┤Set Hostname├────────────────────┐
            │ Please choose a hostname for this machine.          │
            │                                                     │
            │ If you are running on a managed network, please ask │
            │ your network administrator for an appropriate name. │
            │ ┌─────────────────────────────────────────────────┐ │
            │ │cheribsd                                         │ │
            │ └─────────────────────────────────────────────────┘ │
            ├─────────────────────────────────────────────────────┤
            │                      [  OK  ]                       │
            └─────────────────────────────────────────────────────┘
Partitioning (automatic or manual)
This tutorial assumes that you are performing a fresh install, or a complete reinstall of your Morello system, with the intention of booting only CheriBSD. It also assumes that you will be using the UFS file system. If these assumpsions are not true, read the FreeBSD documentation for more information on partitioning disks before proceeding.
Press Enter to select an automated UFS install:
              ┌─────────────────┤Partitioning├──────────────────┐
              │ How would you like to partition your disk?      │
              │ ┌─────────────────────────────────────────────┐ │
              │ │Auto (UFS) Guided UFS Disk Setup             │ │
              │ │Auto (ZFS) EXPERIMENTAL Guided Root-on-ZFS   │ │
              │ │Manual     Manual Disk Setup (experts)       │ │
              │ │Shell      Open a shell and partition by hand│ │
              │ └─────────────────────────────────────────────┘ │
              ├─────────────────────────────────────────────────┤
              │              [  OK  ]     [Cancel]              │
              └─────────────────────────────────────────────────┘
Partition (entire disk)
Select Entire Disk and press Enter:
                 ┌────────────────┤Partition├────────────────┐
                 │ Would you like to use this entire disk    │
                 │ (ada0) for FreeBSD or partition it to     │
                 │ share it with other operating systems?    │
                 │ Using the entire disk will erase any data │
                 │ currently stored there.                   │
                 ├───────────────────────────────────────────┤
                 │      [Entire Disk]     [ Partition ]      │
                 └───────────────────────────────────────────┘
Partition (entire disk - confirmation)
Press Enter to confirm:
                 ┌────────────────┤Partition├────────────────┐
                 │ Would you like to use this entire disk    │
                 │ (ada┌────────┤Confirmation├─────────┐     │
                 │ shar│ This will erase the disk. Are │     │
                 │ Usin│ you sure you want to proceed? │  ta │
                 │ curr├───────────────────────────────┤     │
                 ├─────│     [ Yes  ]     [  No  ]     │  ───┤
                 │     └───────────────────────────────┘     │
                 └───────                                 ───┘
Partition Editor
Review the proposed partition scheme, select Finish, and then press Enter to proceed:
            ┌─────────────────┤Partition Editor├──────────────────┐
            │ Please review the disk setup. When complete, press  │
            │ the Finish button.                                  │
            │                                                     │
            │                                                     │
            │ ┌─────────────────────────────────────────────────┐ │
            │ │ada0       224 GB    GPT                         │ │
            │ │  ada0p1   260 MB    efi             /boot/efi   │ │
            │ │  ada0p2   220 GB    freebsd-ufs     /           │ │
            │ │  ada0p3   3.6 GB    freebsd-swap    none        │ │
            │ │da0        29 GB     GPT                         │ │
            │ │  da0p1    33 MB     efi                         │ │
            │ │  da0p2    3.0 GB    freebsd-ufs                 │ │
            │ │                                                 │ │
            │ │                                                 │ │
            │ │                                                 │ │
            │ └─────────────────────────────────────────────────┘ │
            ├─────────────────────────────────────────────────────┤
            │[Create] [Delete] [Modify] [Revert] [ Auto ] [Finish]│
            └─────────────────────────────────────────────────────┘
Partition editor - confirmation
Select Commit and press Enter to continue with writing out a new partition table:
            ┌─────────────────┤Partition Editor├──────────────────┐
            │ Please review the disk setup. When complete, press  │
            │ the Finish button.                                  │
            │                                                     │
            │                                                     │
            │ ┌─────────────────────────────────────────────────┐ │
            │ │┌────────────────┤Confirmation├─────────────────┐│ │
            │ ││ Your changes will now be written to disk. If  │  │
            │ ││ you have chosen to overwrite existing data,   │  │
            │ ││ it will be PERMANENTLY ERASED. Are you sure   │  │
            │ ││ you want to commit your changes?              │  │
            │ │├───────────────────────────────────────────────┤  │
            │ ││[   Commit    ] [Revert & Exit] [    Back     ]│  │
            │ │└───────────────────────────────────────────────┘  │
            │ │                                                   │
            │ │                                                 │ │
            │ └─────────────────────────────────────────────────┘ │
            ├─────────────────────────────────────────────────────┤
            │[Create] [Delete] [Modify] [Revert] [ Auto ] [Finish]│
            └─────────────────────────────────────────────────────┘
The installation proceeds
The installer will now proceed to check distribution files and unpack them onto the disk. Unless something goes wrong, no user interaction is required. Typical output from the installation process will look like this:
┌───────────────────────────┤Checksum Verification├──────────────────────────┐
│ base.txz                                                   [ In Progress ] │
│ kernel.txz                                                 [   Pending   ] │
│ base-dbg.txz                                               [   Pending   ] │
│ kernel-dbg.txz                                             [   Pending   ] │
│ kernel.GENERIC-MORELLO-NOCAPREVOKE-NODEBUG-dbg.txz         [   Pending   ] │
│ kernel.GENERIC-MORELLO-NOCAPREVOKE-NODEBUG.txz             [   Pending   ] │
│ kernel.GENERIC-MORELLO-NOCAPREVOKE-dbg.txz                 [   Pending   ] │
│ kernel.GENERIC-MORELLO-NOCAPREVOKE.txz                     [   Pending   ] │
│ kernel.GENERIC-MORELLO-NODEBUG-dbg.txz                     [   Pending   ] │
│ kernel.GENERIC-MORELLO-NODEBUG.txz                         [   Pending   ] │
│ kernel.GENERIC-MORELLO-PURECAP-BENCHMARK-NOCAPREVOKE-NO... [   Pending   ] │
│ kernel.GENERIC-MORELLO-PURECAP-BENCHMARK-NOCAPREVOKE-NO... [   Pending   ] │
│ kernel.GENERIC-MORELLO-PURECAP-BENCHMARK-NOCAPREVOKE-db... [   Pending   ] │
│ ...                                                                        │
│                                                                            │
│ Verifying checksums of selected distributions.                             │
│                                                                            │
│  ┌─Overall Progress─────────────────────────────────────────────────────┐  │
│  │                                   0%                                 │  │
│  └──────────────────────────────────────────────────────────────────────┘  │
└────────────────────────────────────────────────────────────────────────────┘
Updating the EFI configuration table
If you are reinstalling a Morello box with an existing OS install, you may be prompted to update the boot configuration. Press Enter to proceed:
                    ┌────────┤Boot Configuration├────────┐
                    │ There are multiple "FreeBSD" EFI   │
                    │ boot entries. Would you like to    │
                    │ remove them all and add a new one? │
                    ├────────────────────────────────────┤
                    │        [ Yes  ]     [  No  ]       │
                    └────────────────────────────────────┘
Setting a root password
Enter a new root password and press Enter. Then confirm it by typing the same password again and pressing Enter.
Please select a password for the system management account (root):
Typed characters will not be visible.
Changing local password for root
New Password:
Network configuration
If desired, configure Ethernet networking by pressing Enter.
      ┌─────────────────────┤Network Configuration├─────────────────────┐
      │ Please select a network interface to configure:                 │
      │ ┌─────────────────────────────────────────────────────────────┐ │
      │ │re0 RealTek 8168/8111 B/C/CP/D/DP/E/F/G PCIe Gigabit Ethernet│ │
      │ └─────────────────────────────────────────────────────────────┘ │
      ├─────────────────────────────────────────────────────────────────┤
      │                      [  OK  ]     [Cancel]                      │
      └─────────────────────────────────────────────────────────────────┘
Network configuration - enabling IPv4
If desired, enable IPv4 on the Ethernet interface by selecting Yes and pressing Enter:
                        ┌───┤Network Configuration├───┐
                        │ Would you like to configure │
                        │ IPv4 for this interface?    │
                        ├─────────────────────────────┤
                        │    [ Yes  ]    [  No  ]     │
                        └─────────────────────────────┘
Network configuration - DHCP for IPv4
If you will be using DHCP, select Yes and press Enter. Otherwise select No and press Enter to perform a manual IPv4 configuration.
                       ┌────┤Network Configuration├───┐
                       │ Would you like to use DHCP   │
                       │ to configure this interface? │
                       ├──────────────────────────────┤
                       │     [ Yes  ]    [  No  ]     │
                       └──────────────────────────────┘
Network configuration - enabling IPv6
If desired, enable IPv6 on the Ethernet interface by selecting Yes and pressing Enter:
                        ┌───┤Network Configuration├───┐
                        │ Would you like to configure │
                        │ IPv6 for this interface?    │
                        ├─────────────────────────────┤
                        │    [ Yes  ]    [  No  ]     │
                        └─────────────────────────────┘
Network configuration - SLAAC for IPv6
Press Enter to use stateless address autoconfiguration for IPv6:
                      ┌─────┤Network Configuration├─────┐
                      │ Would you like to try stateless │
                      │ address autoconfiguration       │
                      │ (SLAAC)?                        │
                      ├─────────────────────────────────┤
                      │      [ Yes  ]     [  No  ]      │
                      └─────────────────────────────────┘
Network configuration - resolver configuration
Enter DNS resolution configuration information, or press Enter to confirm autoconfigured DNS configuration:
    ┌───────────────────────┤Network Configuration├───────────────────────┐
    │ Resolver Configuration                                              │
    │ ┌─────────────────────────────────────────────────────────────────┐ │
    │ │Search         localdomain                                       │ │
    │ │IPv6 DNS #1                                                      │ │
    │ │IPv6 DNS #2                                                      │ │
    │ │IPv4 DNS #1    192.168.1.1                                       │ │
    │ │IPv4 DNS #2                                                      │ │
    │ └─────────────────────────────────────────────────────────────────┘ │
    ├─────────────────────────────────────────────────────────────────────┤
    │                        [  OK  ]     [Cancel]                        │
    └─────────────────────────────────────────────────────────────────────┘
Local or UTC clock
Press Enter to select a system clock on UTC:
   ┌───────────┤Select local or UTC (Greenwich Mean Time) clock├───────────┐
   │ Is this machine's CMOS clock set to UTC?  If it is set to local time, │
   │ or you don't know, please choose NO here!                             │
   │                                                                       │
   ├───────────────────────────────────────────────────────────────────────┤
   │                          [ Yes  ]   [  No  ]                          │
   └───────────────────────────────────────────────────────────────────────┘
Timezone selection
Press Enter to select UTC as your timezone; otherwise, select your continent and press Enter.
                      ┌──────┤Time Zone Selector├───────┐
                      │ Select a region                 │
                      │ ┌─────────────────────────────┐ │
                      │ │0  UTC                       │ │
                      │ │1  Africa                    │ │
                      │ │2  America -- North and South│ │
                      │ │3  Antarctica                │ │
                      │ │4  Arctic Ocean              │ │
                      │ │5  Asia                      │ │
                      │ │6  Atlantic Ocean            │ │
                      │ │7  Australia                 │ │
                      │ │8  Europe                    │ │
                      │ │9  Indian Ocean              │ │
                      │ │10 Pacific Ocean             │ │
                      │ └─────────────────────────────┘ │
                      ├─────────────────────────────────┤
                      │      [  OK  ]     [Cancel]      │
                      └─────────────────────────────────┘
If you have not selected UTC, select your country and press Enter:
        ┌────────────────────┤Countries in Europe├────────────────────┐
        │ Select a country or region                                  │
        │ ┌─^^^─────────────────────────────────────────────────────┐ │
        │ │ 35 Poland                                               │ │
        │ │ 36 Portugal                                             │ │
        │ │ 37 Romania                                              │ │
        │ │ 38 Russian Federation                                   │ │
        │ │ 39 San Marino                                           │ │
        │ │ 40 Serbia                                               │ │
        │ │ 41 Slovakia                                             │ │
        │ │ 42 Slovenia                                             │ │
        │ │ 43 Spain                                                │ │
        │ │ 44 Svalbard and Jan Mayen                               │ │
        │ │ 45 Sweden                                               │ │
        │ │ 46 Switzerland                                          │ │
        │ │ 47 Turkey                                               │ │
        │ │ 48 Ukraine                                              │ │
        │ │ 49 United Kingdom of Great Britain and Northern Ireland │ │
        │ │ 50 Åland Islands                                        │ │
        │ └────────────────────────────────────────────────100%─────┘ │
        ├─────────────────────────────────────────────────────────────┤
        │                     [  OK  ]   [Cancel]                     │
        └─────────────────────────────────────────────────────────────┘
Confirm your choice by selecting Yes and pressing Enter:
   ┌────────────────────────────┤Confirmation├────────────────────────────┐
   │ Does the abbreviation `UTC' look reasonable?                         │
   ├──────────────────────────────────────────────────────────────────────┤
   │                         [ Yes  ]     [  No  ]                        │
   └──────────────────────────────────────────────────────────────────────┘
Setting the date and time
As desired, set the date, or select Skip and press Enter if you plan to use network time synchronization:
                   ┌─────────────┤Time & Date├────────────┐
                   │  Month            Year               │
                   │  ┌───────────────┐┌───────────────┐  │
                   │  │           July││           2024│  │
                   │  └───────────────┘└───────────────┘  │
                   │  ┌────────────────────────────────┐  │
                   │  │    Sun Mon Tue Wed Thu Fri Sat │  │
                   │  │         1   2   3   4   5   6  │  │
                   │  │     7   8   9  10  11  12  13  │  │
                   │  │    14  15  16  17  18  19  20  │  │
                   │  │    21  22  23  24  25  26  27  │  │
                   │  │    28  29  30  31              │  │
                   │  │                                │  │
                   │  └────────────────────────────────┘  │
                   ├──────────────────────────────────────┤
                   │       [Set Date]     [  Skip  ]      │
                   └──────────────────────────────────────┘
And, likewise, the time:
                   ┌─────────────┤Time & Date├────────────┐
                   │            ┌──┐ ┌──┐ ┌──┐            │
                   │            │11│:│23│:│20│            │
                   │            └──┘ └──┘ └──┘            │
                   ├──────────────────────────────────────┤
                   │       [Set Time]     [  Skip  ]      │
                   └──────────────────────────────────────┘
System configuration
As desired, enable any further services (e.g., ntpd and ntpd_sync_on_start) by
selecting them and hitting Space:
┌───────────────────────────┤System Configuration├───────────────────────────┐
│ Choose the services you would like to be started at boot:                  │
│ ┌────────────────────────────────────────────────────────────────────────┐ │
│ │[ ] local_unbound      Local caching validating resolver                │ │
│ │[X] sshd               Secure shell daemon                              │ │
│ │[ ] moused             PS/2 mouse pointer on console                    │ │
│ │[ ] ntpd               Synchronize system and network time              │ │
│ │[ ] ntpd_sync_on_start Sync time on ntpd startup, even if offset is high│ │
│ │[ ] powerd             Adjust CPU frequency dynamically if supported    │ │
│ │[X] dumpdev            Enable kernel crash dumps to /var/crash          │ │
│ │[ ] debugger_on_panic  Run debugger on kernel panic                     │ │
│ └────────────────────────────────────────────────────────────────────────┘ │
├────────────────────────────────────────────────────────────────────────────┤
│                                  [  OK  ]                                  │
└────────────────────────────────────────────────────────────────────────────┘
Then press Enter to continue.
Add user accounts
If you plan to install the desktop environment in the next step, it is useful to create user accounts now. If desired, select Yes and press Enter to add non-root accounts. Otherwise, select No and press Enter
                       ┌──────┤Add User Accounts├─────┐
                       │ Would you like to add users  │
                       │ to the installed system now? │
                       ├──────────────────────────────┤
                       │     [ Yes  ]    [  No  ]     │
                       └──────────────────────────────┘
If you add non-root users, we recommend adding them to the wheel,
operator, and video groups to allow them to manage the system as well as
use the desktop environment.
CHERI Desktop environment
If you wish to configure your CheriBSD system with a KDE-based desktop environment you can do so now. NOTE: You must have previously configured the network and be able to reach pkg.CheriBSD.org.
                      ┌─────────┤CHERI Desktop├────────┐
                      │ Would you like to install the  │
                      │ CHERI desktop environment      │
                      │ (requires network)?            │
                      ├────────────────────────────────┤
                      │      [ Yes  ]     [  No  ]     │
                      └────────────────────────────────┘
Select Yes to install (NOTE: this may take 20-50 minutes depending on network conditions).
Virtualization support
If you wish to configure your CheriBSD system to support bhyve-based,
CHERI-enabled virtual machines, press Enter:
                      ┌───────┤CHERI VM Support├────────┐
                      │ Would you like to install CHERI │
                      │ virtual machine support         │
                      │ (requires network)?             │
                      ├─────────────────────────────────┤
                      │      [ Yes  ]     [  No  ]      │
                      └─────────────────────────────────┘
Final configuration
If there are further configuration settings to change, use the up/down arrow keys to highlight an appropriate option from the menu, then use the left arrow key to select the Select button and press Enter. Otherwise, press Enter to complete the installation:
┌────────────────────────────┤Final Configuration├───────────────────────────┐
│ Setup of your FreeBSD system is nearly complete. You can now modify your   │
│ configuration choices. After this screen, you will have an opportunity to  │
│ make more complex changes using a shell.                                   │
│ ┌────────────────────────────────────────────────────────────────────────┐ │
│ │Add User         Add a user to the system                               │ │
│ │Root Password    Change root password                                   │ │
│ │Hostname         Set system hostname                                    │ │
│ │Network          Networking configuration                               │ │
│ │Services         Set daemons to run on startup                          │ │
│ │System Hardening Set security options                                   │ │
│ │Time Zone        Set system timezone                                    │ │
│ │Handbook         Install FreeBSD Handbook (requires network)            │ │
│ │CHERI Desktop    Install the CHERI desktop environment (requires network│ │
│ │CHERI VM Support Install CHERI virtual machine support (requires network│ │
│ └────────────────────────────────────────────────────────────────────────┘ │
├────────────────────────────────────────────────────────────────────────────┤
│                            [Select]     [Finish]                           │
└────────────────────────────────────────────────────────────────────────────┘
Manual configuration
If desired, select Yes and press Enter to drop to a shell before reboot. Otherwise, select No and press Enter.
                 ┌──────────┤Manual Configuration├──────────┐
                 │ The installation is now finished. Before │
                 │ exiting the installer, would you like to │
                 │ open a shell in the new system to make   │
                 │ any final manual modifications?          │
                 ├──────────────────────────────────────────┤
                 │           [ Yes  ]     [  No  ]          │
                 └──────────────────────────────────────────┘
Complete
Select Reboot and press Enter:
                  ┌───────────────┤Complete├────────────────┐
                  │ Installation of FreeBSD complete! Would │
                  │ you like to reboot into the installed   │
                  │ system now?                             │
                  ├─────────────────────────────────────────┤
                  │[  Reboot   ] [ Shutdown  ] [Live System]│
                  └─────────────────────────────────────────┘
Rebooting after installation
Remove the USB stick to prevent the installer from running after a system reboot. If you have issues with reliabity rebooting your Morello box, confirm that you are using a recent Morello firmware revision due to a known firmware bug in earlier versions that made OS-triggered reboot unreliable.
Logging in
Log in using the username root and the password you entered during the
installation process:
...
Performing sanity check on sshd configuration.
Starting sshd.
Starting cron.
Starting background file system checks in 60 seconds.
Starting sddm.

Sat Jul 20 00:12:09 UTC
CheriBSD/arm64 (cheribsd) (ttyu0)

login: root
Password:
Jul 20 00:12:13 cheribsd login[968]: ROOT LOGIN (root) ON ttyu0
FreeBSD 15.0-CURRENT (GENERIC-MORELLO-PURECAP) #0 releng/24.05-b2ad856aac65: Fri Jul 19 21:17:24 UTC 2024

Welcome to CheriBSD!

CheriBSD extends FreeBSD to implement memory protection and software
compartmentalization features enabled by CHERI-extended CPUs.

The CheriBSD front page:
  https://www.cheribsd.org/

We provide support via a mailing list:
  https://www.cl.cam.ac.uk/research/security/ctsrd/cheri/cheri-lists.html

And also via the CHERI-CPU Slack:
  https://www.cl.cam.ac.uk/research/security/ctsrd/cheri/cheri-slack.html

CheriBSD source may be found at:
  https://github.com/CTSRD-CHERI/cheribsd/

Find out more about about CHERI at https://cheri-cpu.org/

WARNING: INVARIANTS kernel option defined, expect reduced performance
WARNING: WITNESS kernel option defined, expect reduced performance
WARNING: capability revocation enabled by default, this may affect performance
root@cheribsd:~ #
You can now add further users, install SSH keys for remote access, install packages, and so on.